 for the latest updates.
Home
Programmable Conversations
Users
API Authentication
Sunshine Conversations Connect
References
iOS SDK
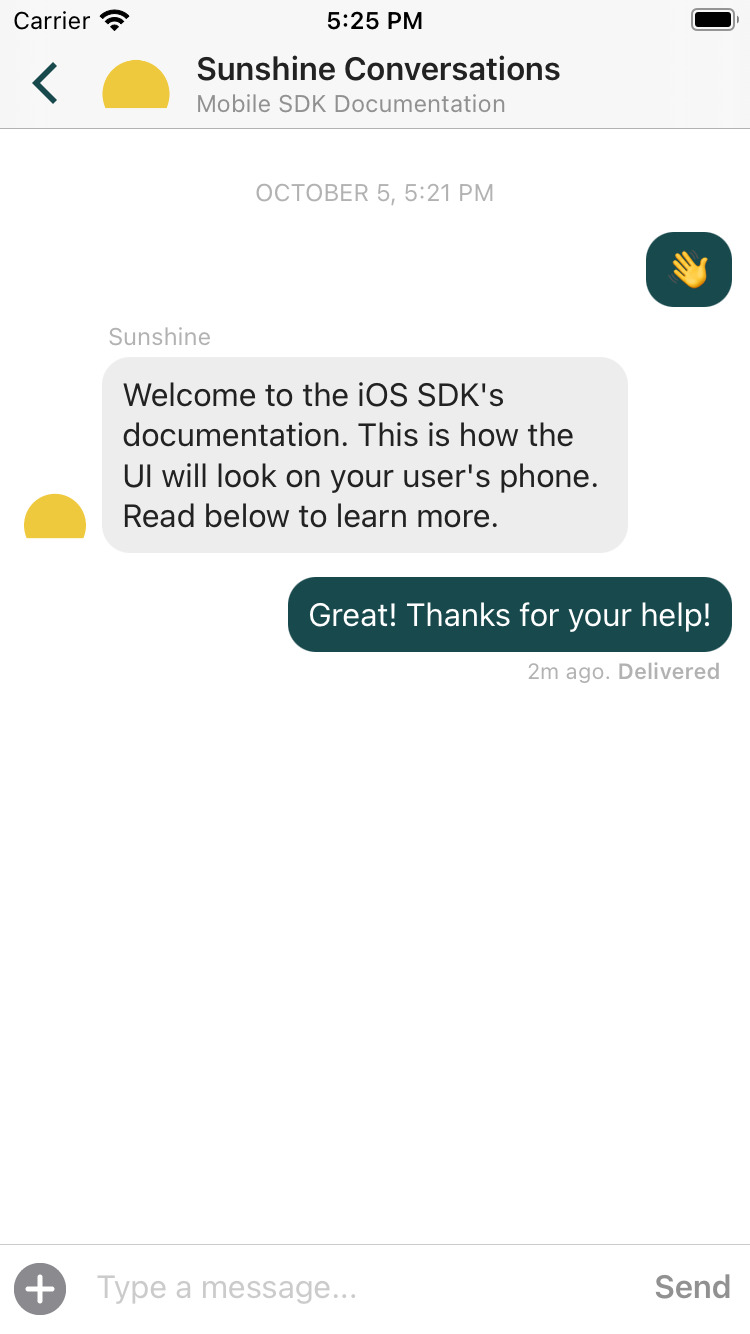
The Sunshine Conversations iOS SDK is a highly customizable chat embeddable that can be added to any iOS app. It supports the Sunshine Conversations API capabilities, push notifications and is fully localized.
Current version: v
- API reference
- Capabilities
- QuickStart to your first Sunshine Conversation on iOS
- Installation
- Authenticating users
- Updating the framework
- Configuring push notifications
- Rich notifications
- Localization
- Customization
- Implementing your own User Interface
Reference
The Sunshine Conversations iOS SDK includes a client side API to initialize, customize and enable advanced use cases of the SDK. See the iOS API reference to discover all the classes and methods available.
Capabilities
The Sunshine Conversations iOS SDK supports a wide variety of capabilities as seen in the channel capabilities grid. Below is a detailed view of each capabilities.
Content Types
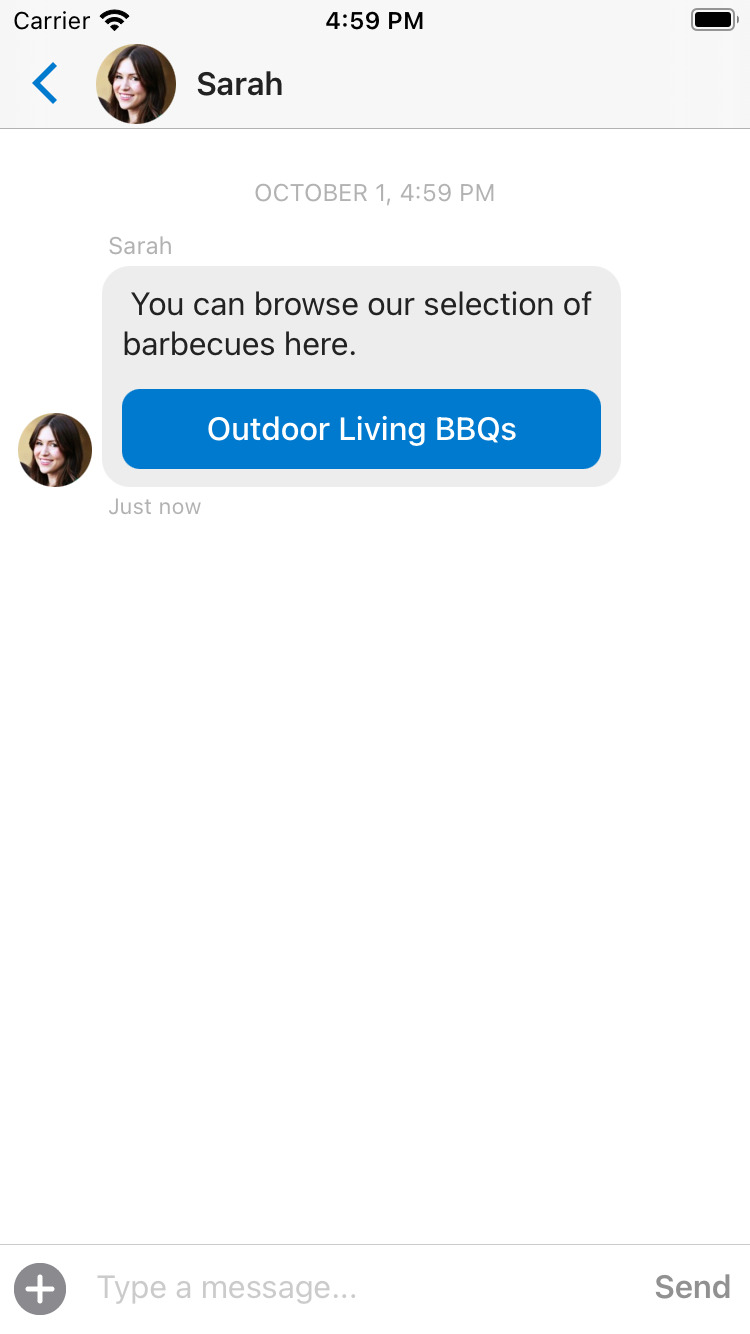
Action Types
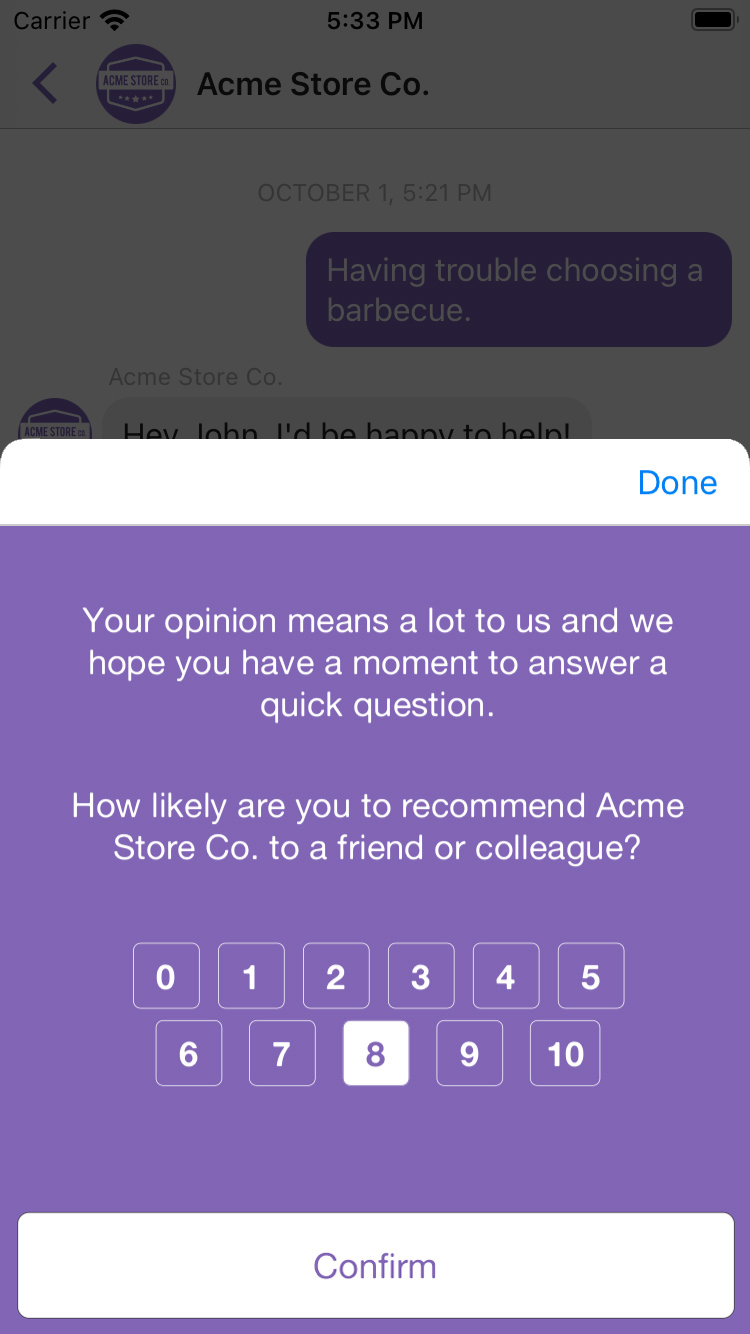
Structured Messages
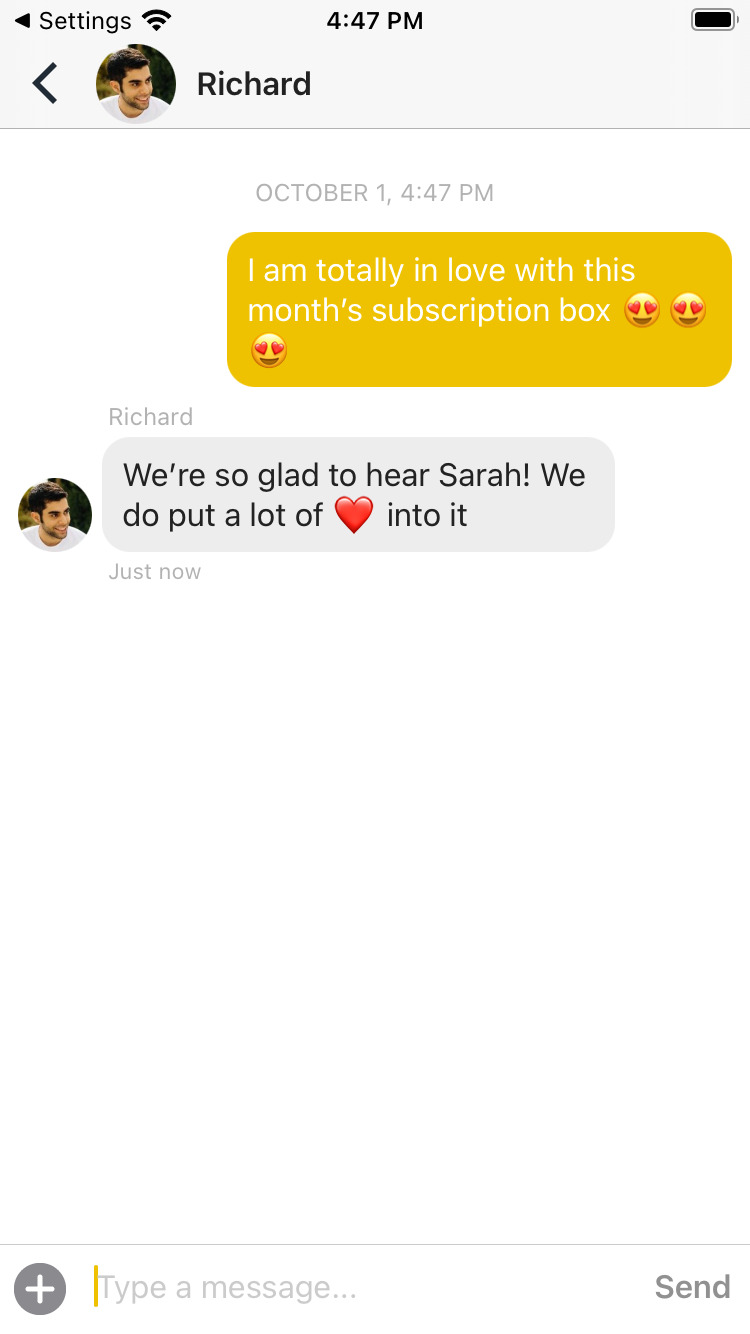
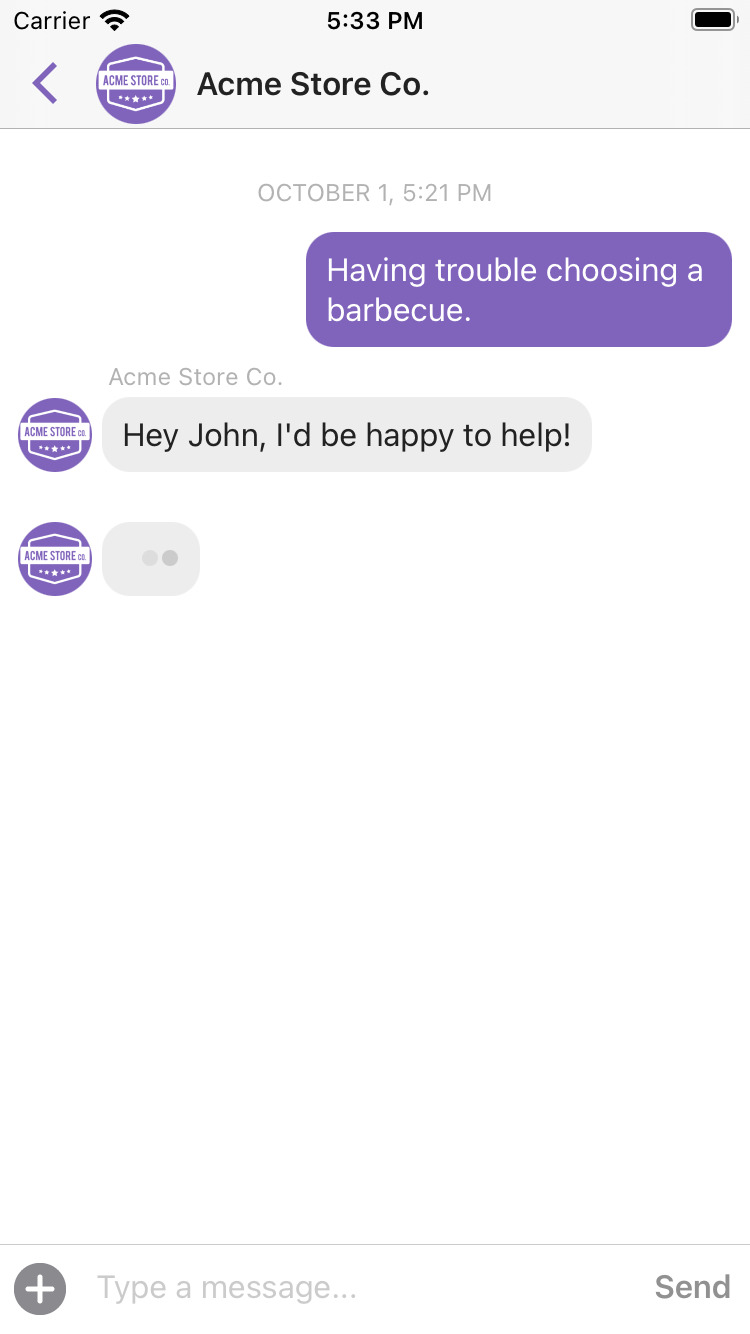
Indicators
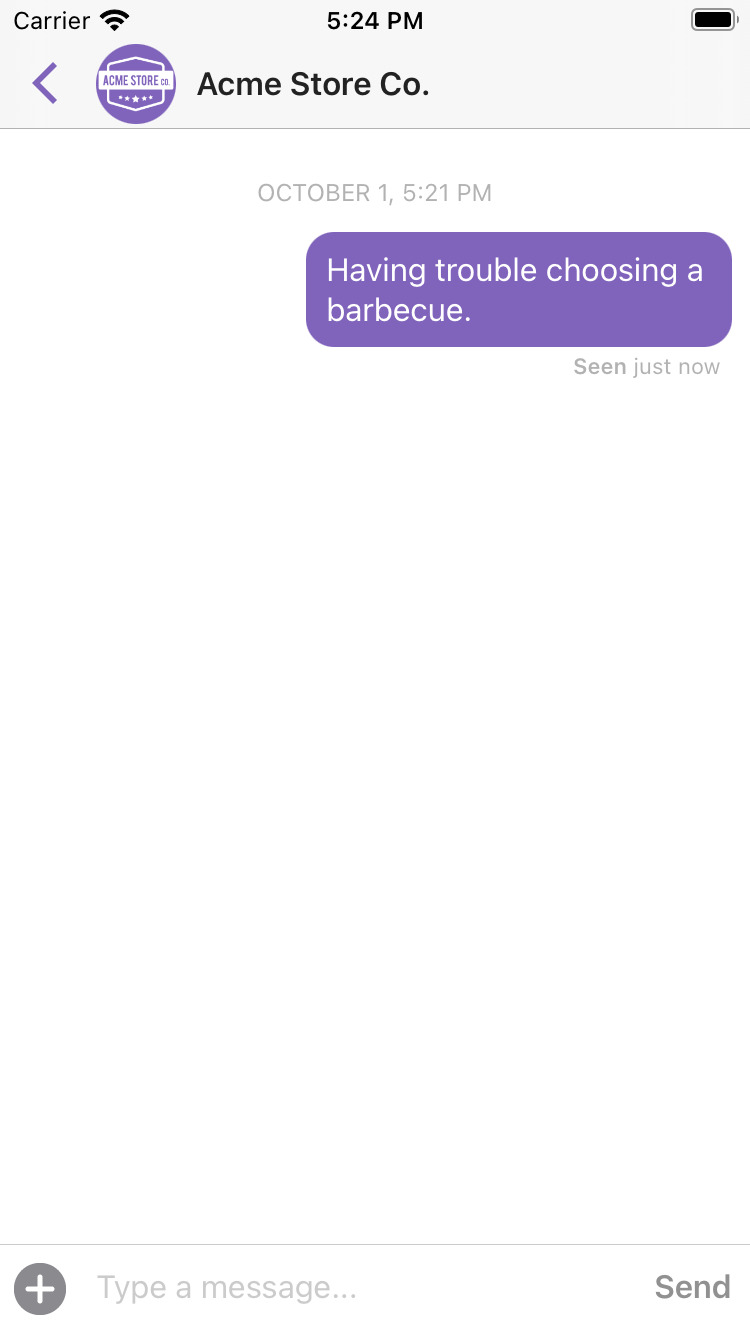

Delivery Events
Delivery events allow you to track deliveries of Sunshine Conversations messages to the iOS SDK by subscribing to the conversation:message:delivery:channel webhook. Sunshine Conversations also tracks user deliveries on the iOS SDK which let you confirm whether a message has reached the user by listening to the conversation:message:delivery:user webhook.
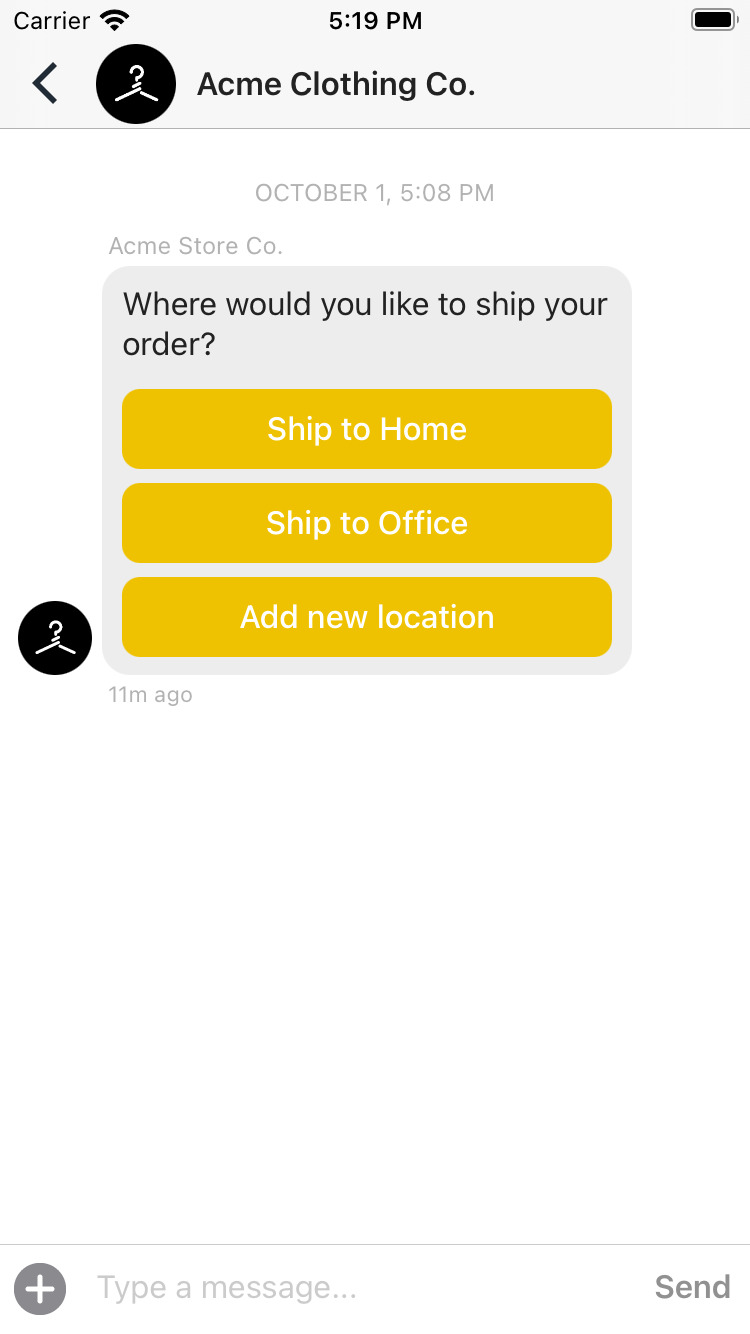
Conversation List
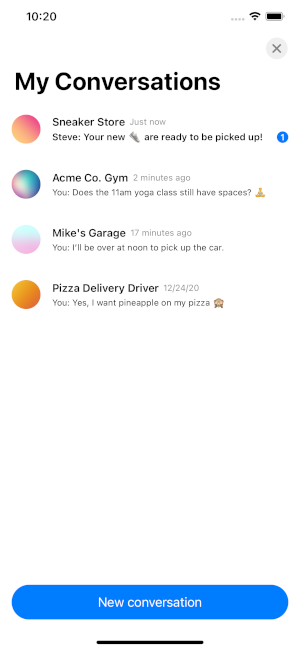
The conversation list allows a user to navigate easily between multiple conversations. In this view, the user can see the names, icons, timestamps and text previews of all conversations.
On initialization, the conversation list loads at most 10 conversations (more if bigger screens allow), ordered from most recently active to least. Users can load additional conversations by scrolling to the bottom of the list.
By default, users can also start new conversations from this view. The business can disallow users to create more conversations by showing the conversation list via the showConversationListWithoutCreateConversationButton method.
For more information on how to update your integration and enable multi-conversation, have a look at our API documentation.
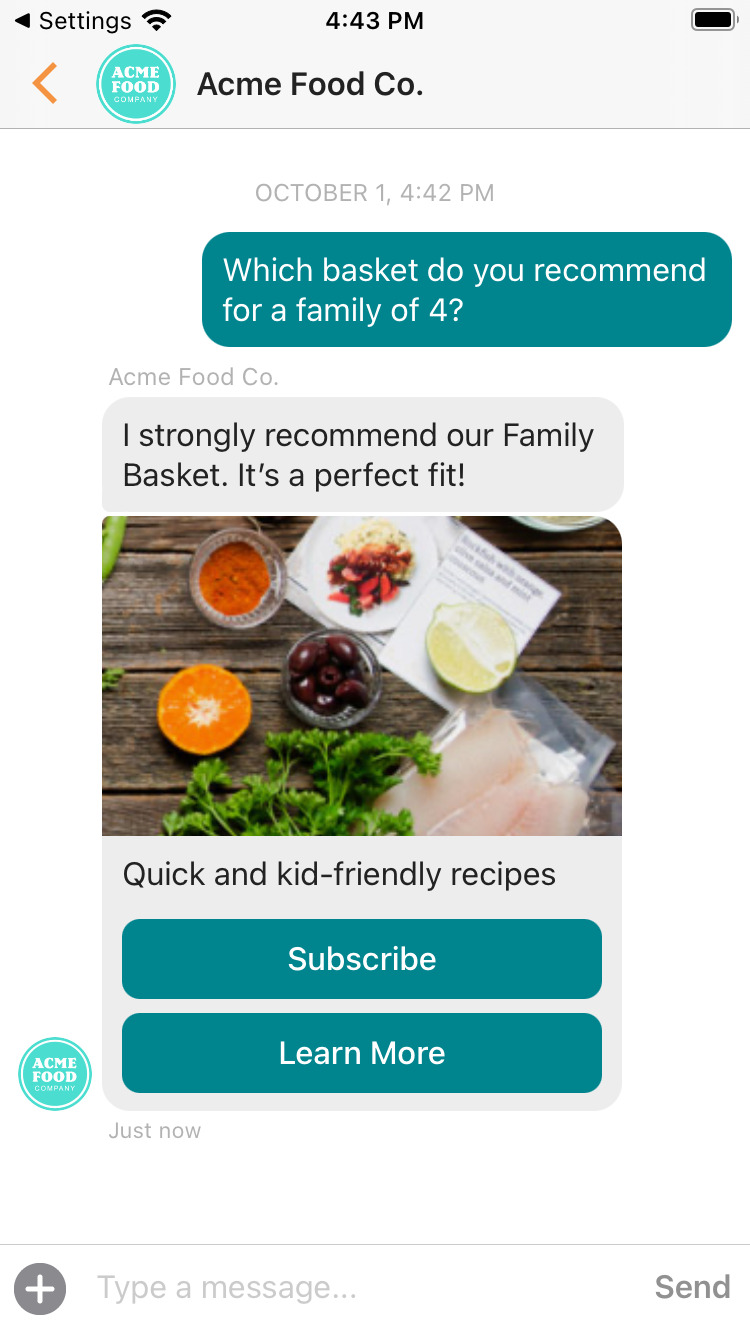
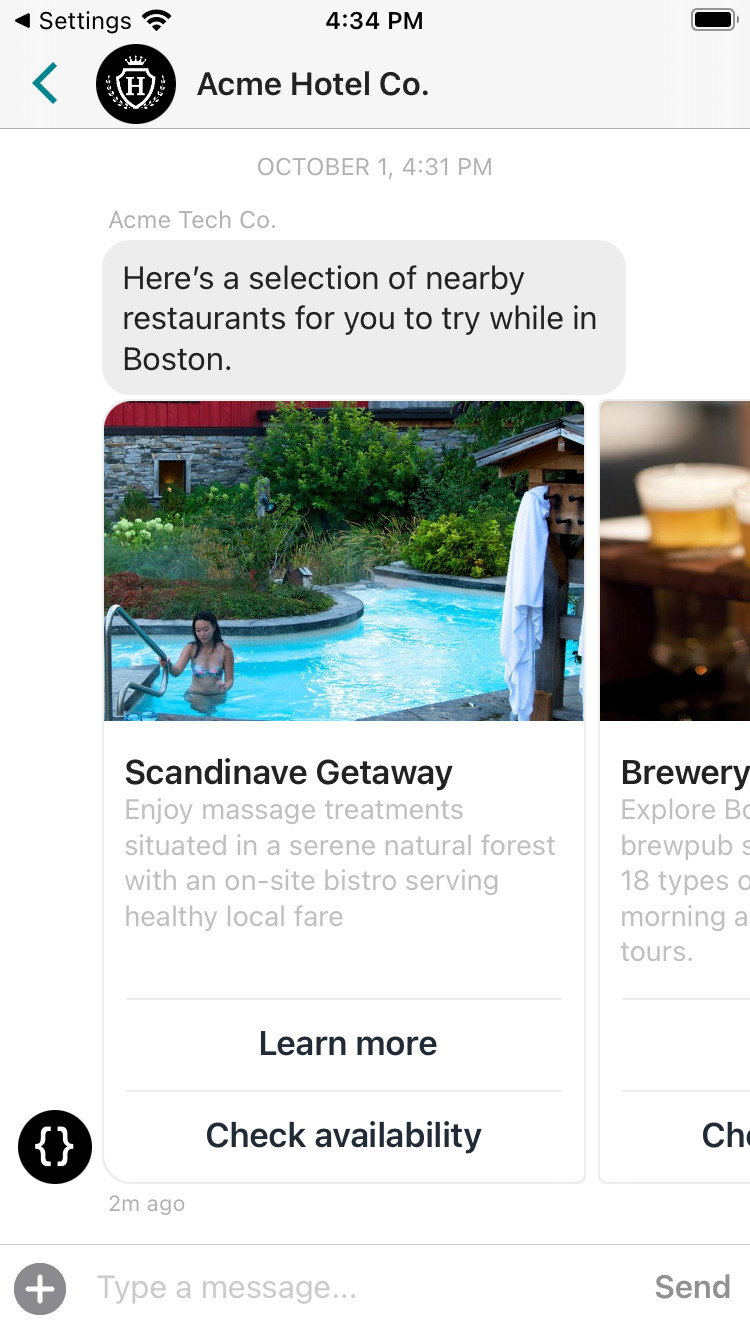
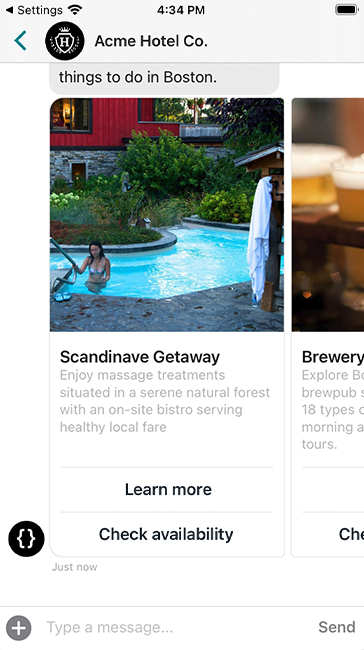
Carousel
Carousels are rendered natively with full functionality in the iOS SDK. See our API documentation for instructions on how to send one.
Carousel items
Carousels support up to a maximum of 10 message items. Each message item must include a title and at least one supported action. Optionally, an image and description can be included as well. Images can be displayed in two different aspect ratios, “square” and “horizontal” (see screenshots below). For more information, see our API documentation.
Carousel items with “horizontal” images (default):

Carousel items with “square” images:
Supported actions
The iOS SDK supports the following action types in a carousel message item:
- Link
- Postback
- Buy
- Webview
List message fallback
If the iOS SDK receives a list type message, it will display a carousel instead.
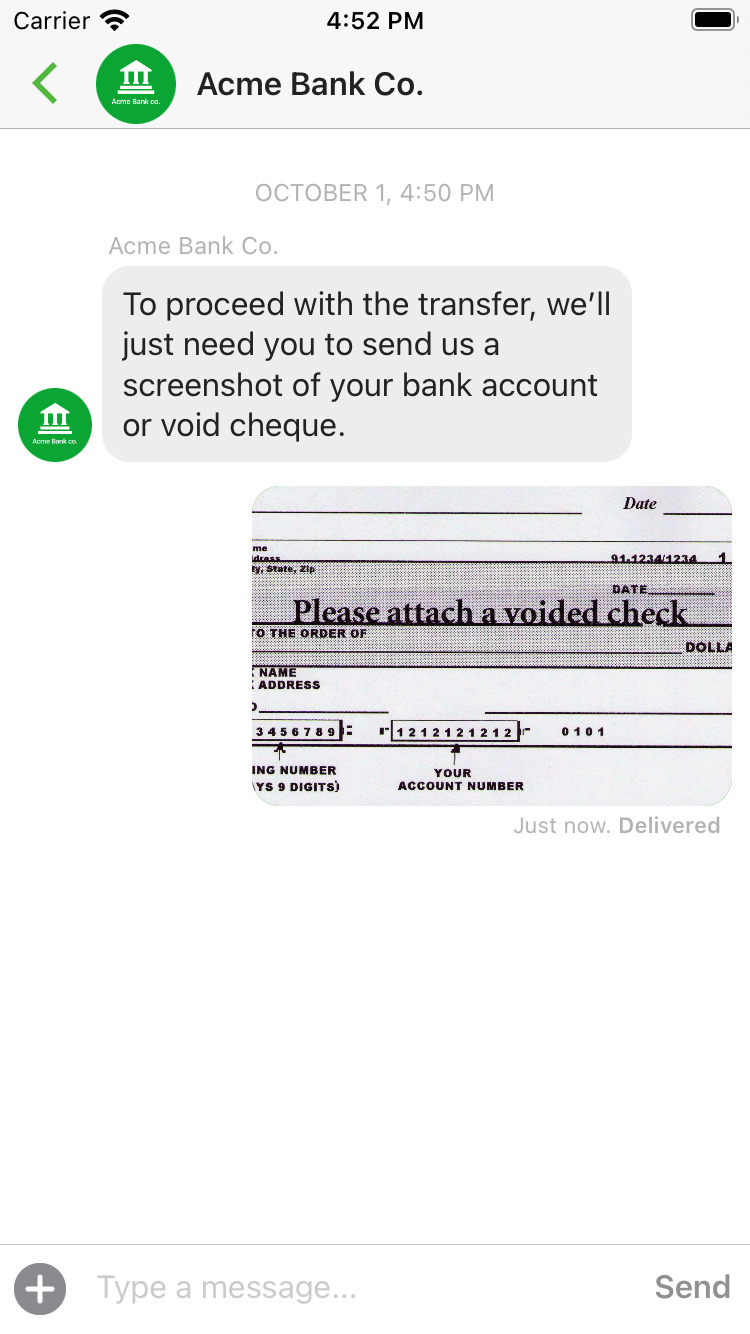
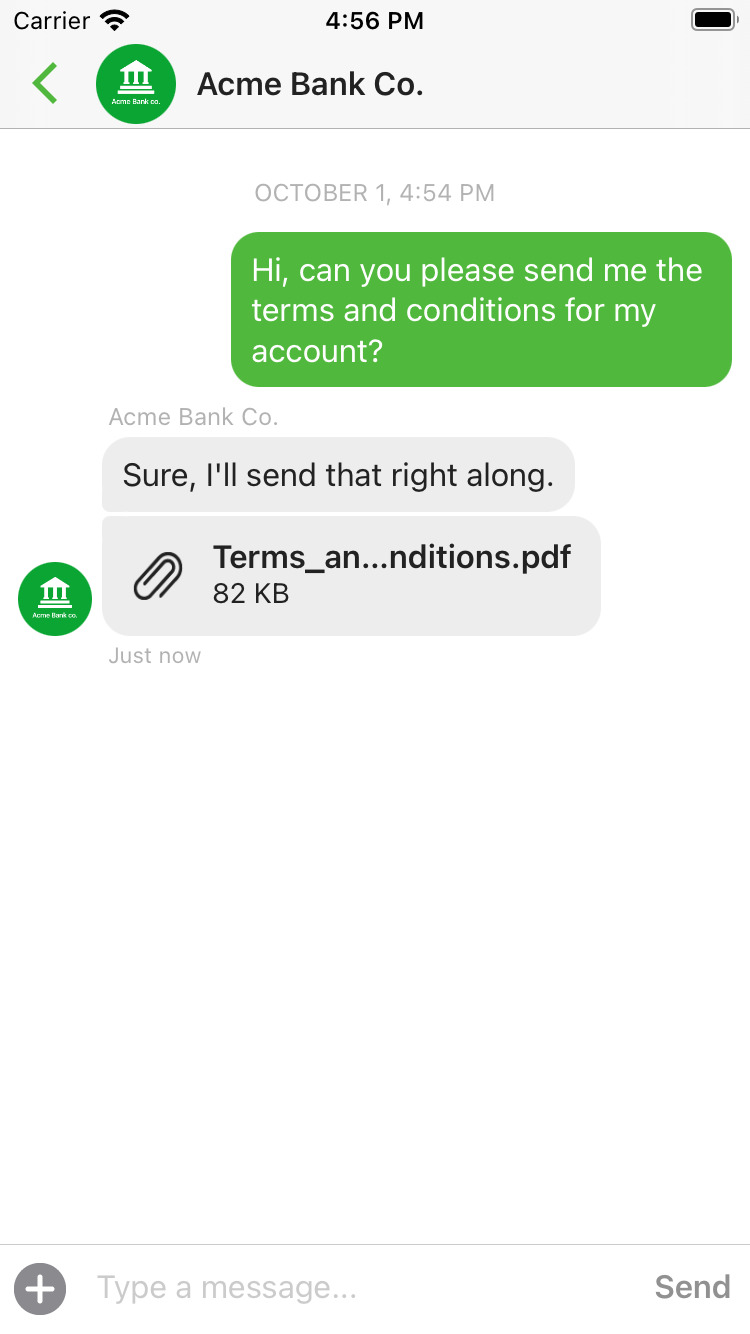
Files
The iOS SDK has full native support for sending and receiving files. See our API documentation for instructions on how to send one.
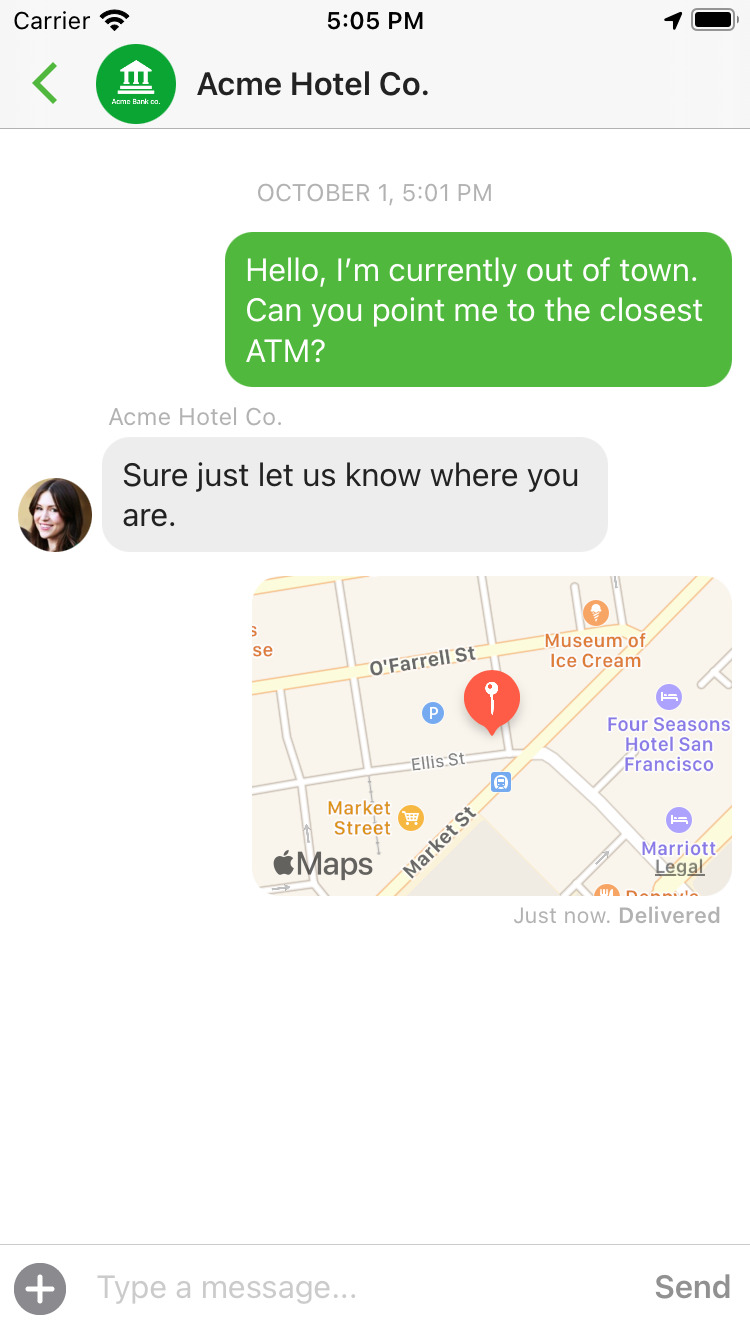
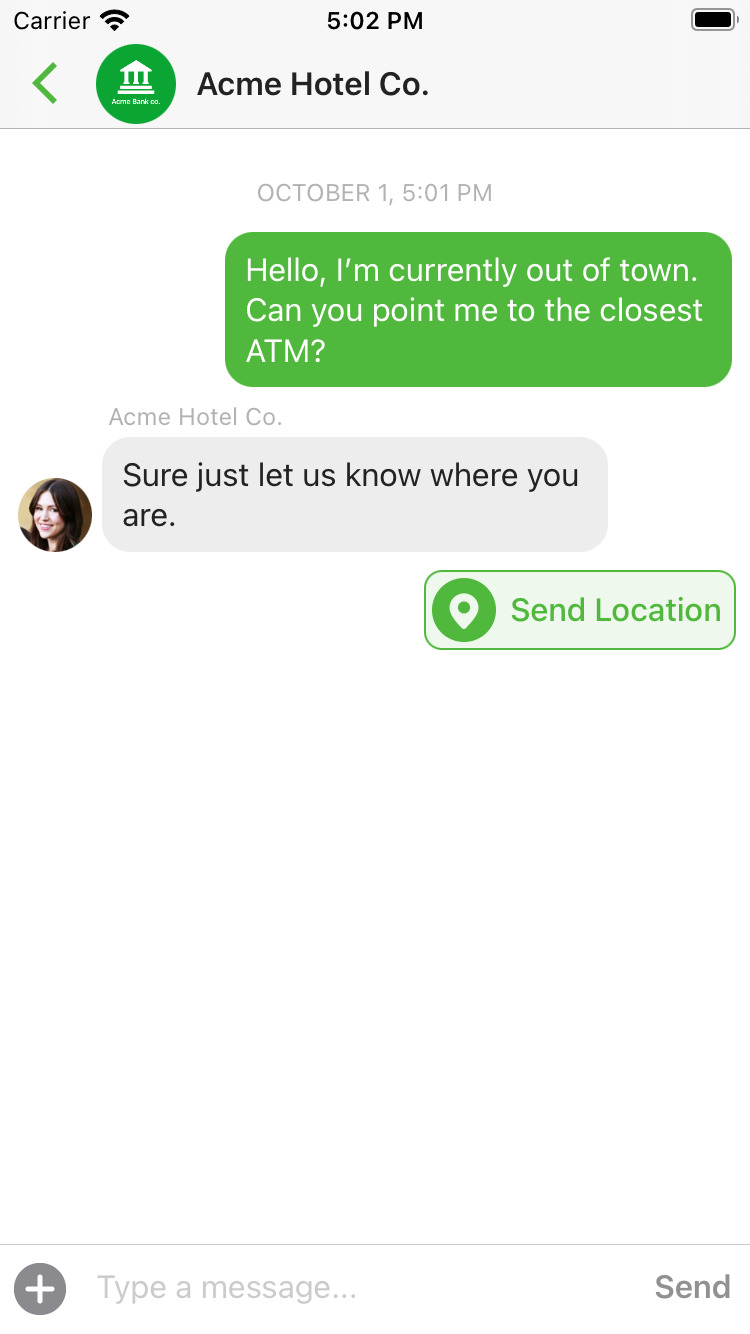
Locations
The iOS SDK has support for sending and receiving location messages. A location message will be rendered as a Maps preview which can be clicked on to open the location in the Maps app. See Location Messages for more information.
QuickStart to your first Sunshine Conversation on iOS
The smooch-ios GitHub repo (link in the header) includes a /SampleApp subfolder with a basic implementation of a mobile messaging app that uses the smooch-ios SDK to send messages from an iOS Device to your Sunshine Conversations app.
Prerequisites
To complete the steps below, you must have Xcode installed, as well as an Apple iOS Device to run the sample mobile app (physical device or simulator).
Steps
- Download or clone the smooch-ios GitHub repo to your local machine
- Launch Xcode
- From the Menu, use
File > Opento open the SampleApp by selectingSunshine Conversations Sample App.xcodeproj. - Navigate to the
SunshineConversationsWrapper.swiftfile. - Replace the integrationId value (default:
"59aad4616082d43a0050a967") with your Sunshine Conversations integrationId (including the double-quotes).- Refer to Initialize Sunshine Conversations in your app for info on creating (or list existing) iOS SDK integrationIds
- Ensure your iOS device is connected (or the simulator has been created/configured)
- From the Menu, select
Product > Run(or CMD+r) - Message your Sunshine Conversations app!
Installation
The iOS SDK supports installation through Swift Package Manager, CocoaPods and Carthage. Read on and follow your preferred way of adding the SDK to your project.
Region configuration
The iOS SDK is supported in the following regions:
| Region | Region identifier |
|---|---|
| United States | Leave unspecified |
| European Union | eu-1 |
To target the EU region for example, set the region identifier in the SKTSettings object:
Objective-C:
SKTSettings settings = [SKTSettings settingsWithIntegrationId:@"YOUR_INTEGRATION_ID"];
settings.region = @"eu-1";
[Smooch initWithSettings:settings completionHandler:^(NSError * _Nullable error, NSDictionary * _Nullable userInfo) {
    if (error == nil) {
      // Your code after init is complete
    } else {
      // Something went wrong during initialization
    }
}];
Swift:
let settings = SKTSettings(integrationId: "YOUR_INTEGRATION_ID")
settings.region = "eu-1"
Smooch.initWith(settings) { (error: Error?, userInfo: [AnyHashable : Any]?) in
    if (error == nil) {
      // Your code after init is complete
    } else {
      // Something went wrong during initialization
    }
}
### Swift Package Manager
Swift Package Manager is a tool for managing the distribution of iOS frameworks. It’s integrated with the Xcode build system to automate the process of downloading, compiling, and linking dependencies.
To add the Sunshine Conversations SDK to your project as a dependency:
-
Follow the Apple documentation on how to add the package to your project.
-
Paste the Sunshine Conversations SDK repo URL (https://github.com/zendesk/sunshine-conversations-ios/) into the Choose repository package search bar.
-
Set your preferred Package Requirements setup.
That’s it! You’re now ready to initialize Sunshine Conversations in your app.
CocoaPods
First, install CocoaPods if it isn’t already:
$ sudo gem install cocoapodsNext, add the Smooch dependency to your Podfile:
pod 'Smooch'Finally, install the pod:
$ pod installThat’s it! You’re now ready to initialize Sunshine Conversations in your app.
Carthage
First, follow the steps to install Carthage on your system if it isn’t already:
$ brew install carthageNext, add the Smooch framework to your Cartfile:
binary "https://raw.githubusercontent.com/zendesk/sunshine-conversations-ios/master/Smooch.json"And finally, follow the installation steps for iOS projects to link the Smooch dependency to your application.
That’s it! You’re now ready to initialize Sunshine Conversations in your app.
Manual Installation
- Download the latest release from our GitHub.
- Unzip the contents of
Smooch.xcframework.zipto a location you have access to. - Open your project and select your project name in the Project Navigator in Xcode.
- Navigate to the General tab.
- Drag the
Smooch.xcframeworkfolder into the Frameworks, Libraries, and Embedded Content section.
That’s it! You’re now ready to initialize Sunshine Conversations in your app.
Import the header file
Import the file into the your app delegate’s .m file and any other places you plan to use it.
Objective-C:
#import <Smooch/Smooch.h>Swift:
import SmoochAdd Required Keys in your app’s Info.plist
The SDK may need to ask users permission to use certain features. Depending on the feature, you must provide a description in your app’s Info.plist to explain why access is required. These descriptions will be displayed the moment we prompt the user for permission.
Images
The SDK allows users to send images to you. To support this feature, you need to provide a description for the following keys:
NSCameraUsageDescription: describes the reason your app access the camera (ex:Camera permission is required to send images to ${PRODUCT_NAME}). More information available here.NSPhotoLibraryUsageDescription: describes the reason your app needs read access to the photo library (ex:Photo library permission is required to send images to ${PRODUCT_NAME}). More information available here.NSPhotoLibraryAddUsageDescription: describes the reason your app needs write access to the photo library (ex:Photo library permission is required to send images to ${PRODUCT_NAME}). More information available here.
Location
The Sunshine Conversations SDK also allows users to send their current location. To support this feature, you must provide a description for any of the following keys depending on your app’s use of location services. Sunshine Conversations will ask the user for the location depending on the key you provide:
NSLocationWhenInUseUsageDescription: describes the reason for your app to access the user’s location information while your app is in use (ex:Location services is required to send your current location to ${PRODUCT_NAME}). This permission is recommended if your app does not use location services and the SDK will default to it if both keys are included. More information available here.NSLocationAlwaysUsageDescription: describes the reason for your app to access the user’s location information at all times (ex:Location services is required to send your current location to ${PRODUCT_NAME}). More information available here.
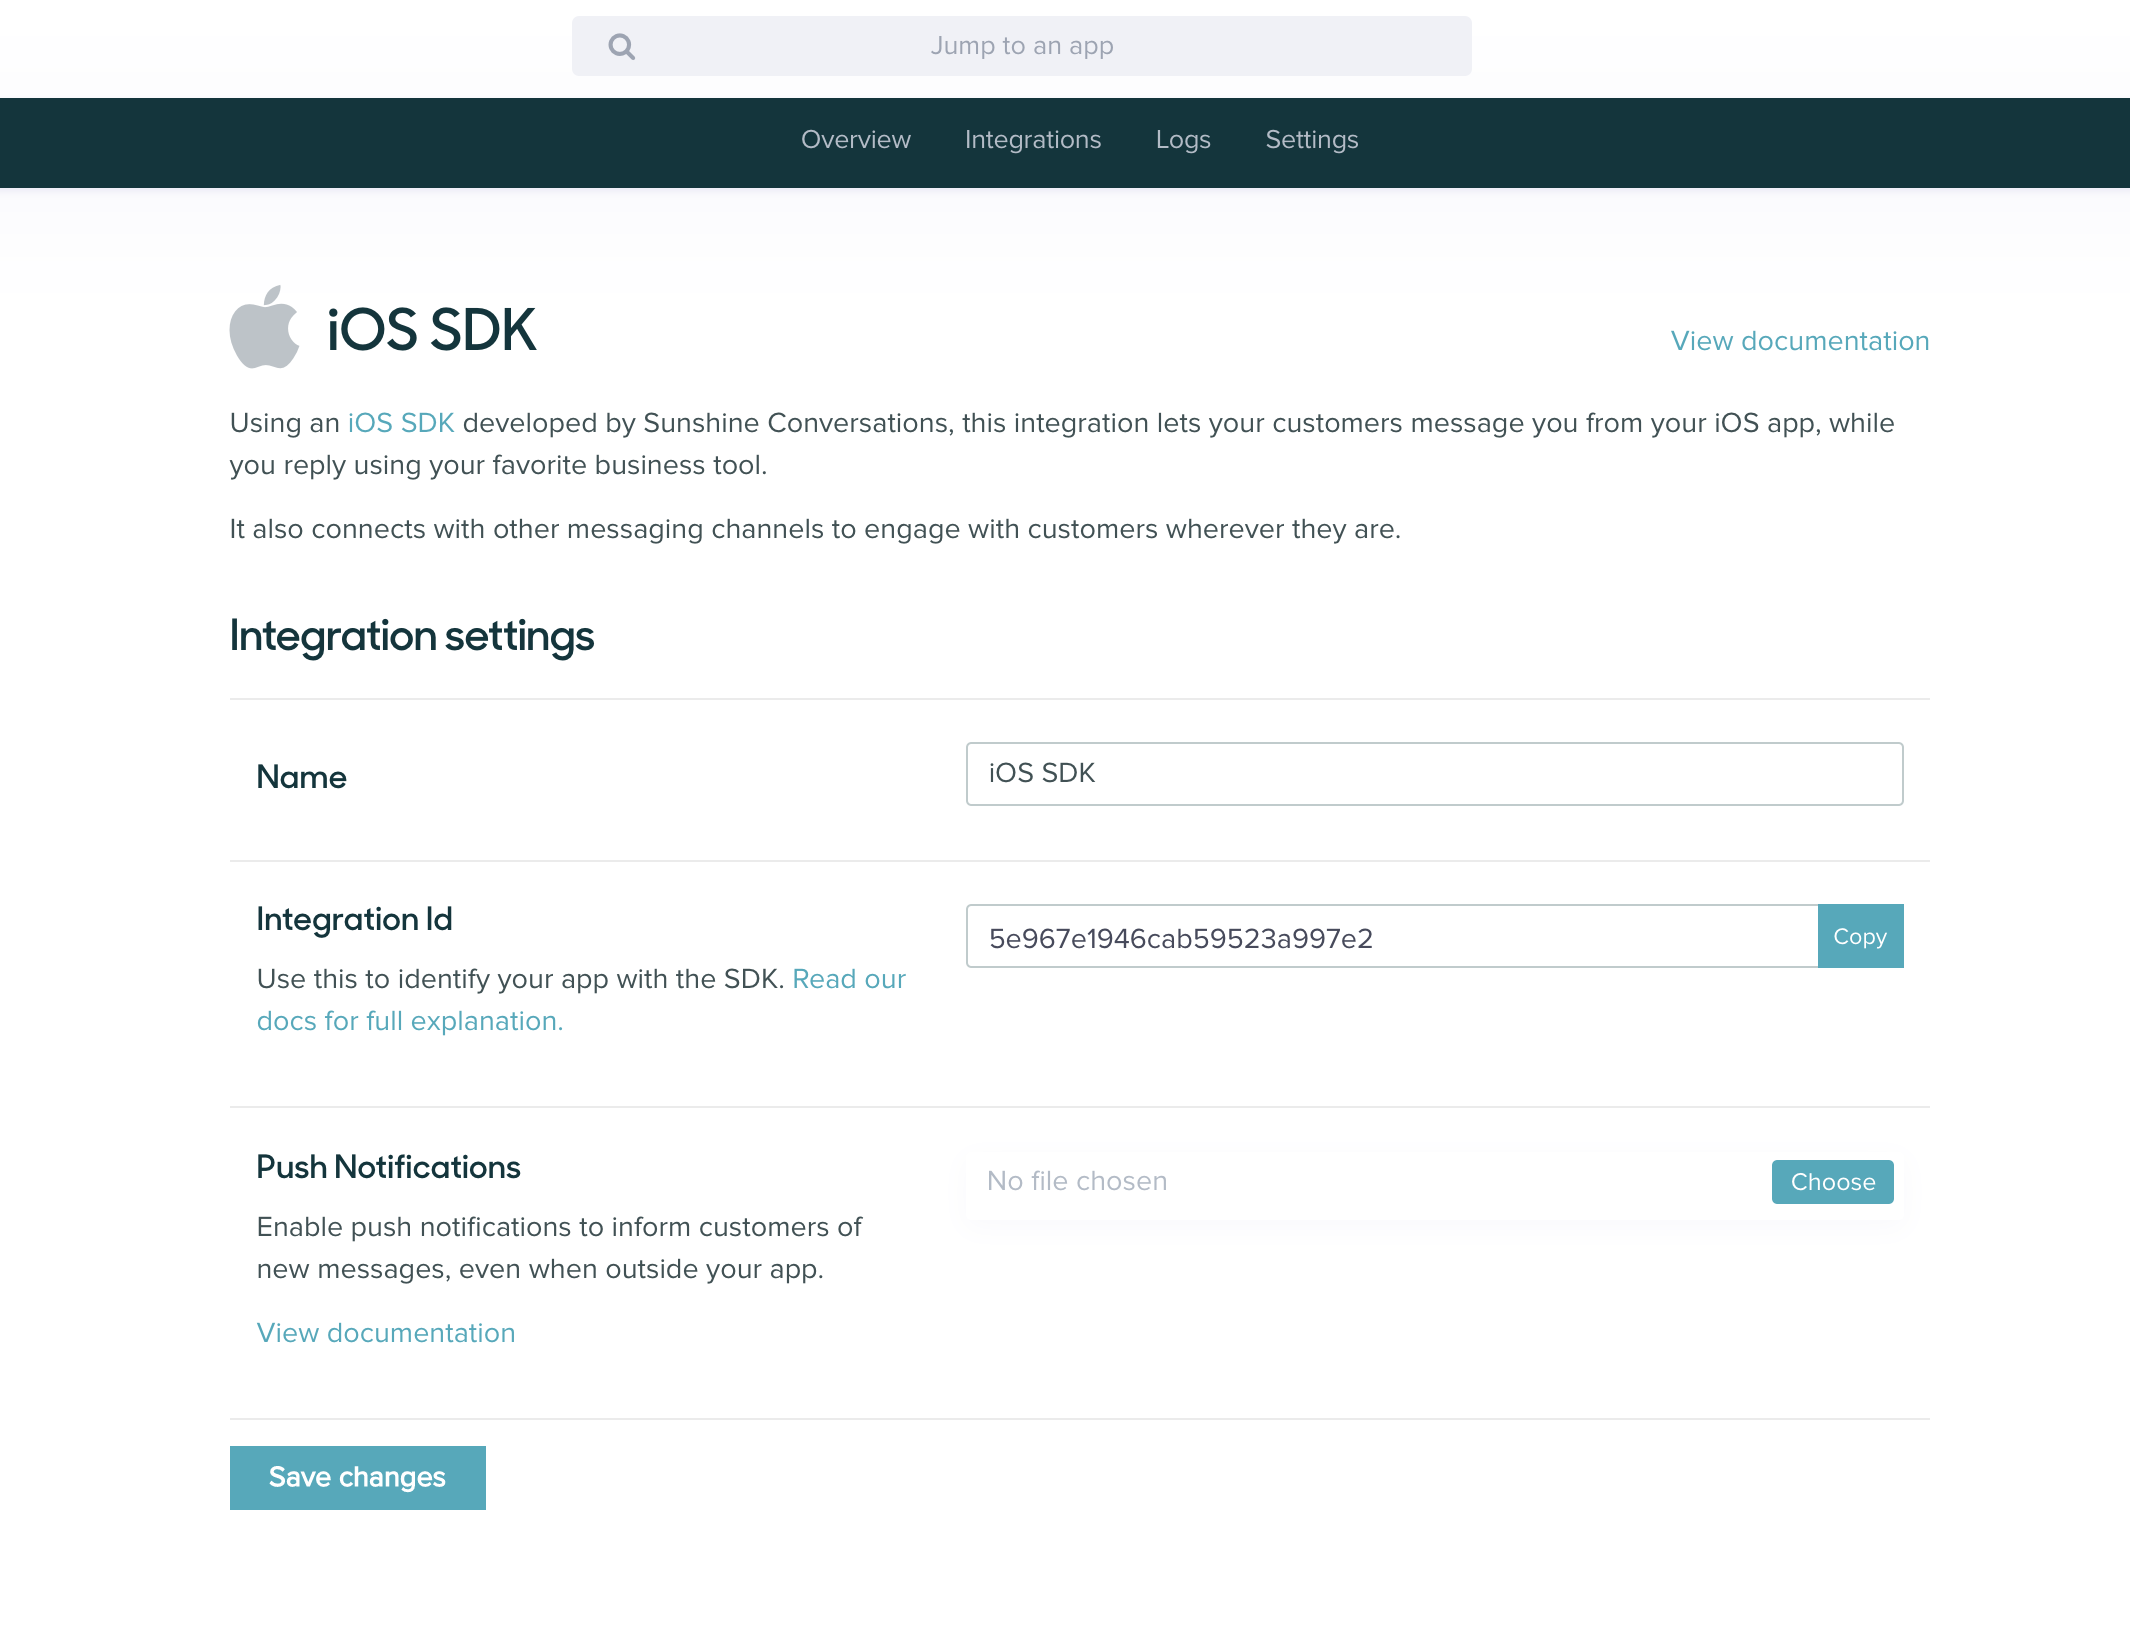
Initialize Sunshine Conversations in your app
After following the steps above, your app is setup for working with the SDK. Before your code can invoke its functionality, you’ll have to initialize the library using your iOS integration ID. This ID uniquely identifies your integration and links it to the Sunshine Conversations backend that does the heavy lifting necessary to bridge the gap between you and your users.
You can find/create your iOS SDK Integration ID in the Sunshine Conversations dashboard when connecting an iOS SDK integration as a Customer Channel to your Sunshine Conversations app. It is also possible to create an iOS SDK integrtation (using type:"ios") through the API, as well as view existing ones as part of an API call to list integrations.
To initialize Sunshine Conversations, add the following line of code to your applicationDidFinishLaunchingWithOptions: method:
Objective-C:
[Smooch initWithSettings:[SKTSettings settingsWithIntegrationId:@"YOUR_INTEGRATION_ID"] completionHandler:^(NSError * _Nullable error, NSDictionary * _Nullable userInfo) {
    if (error == nil) {
      // Your code after init is complete
    } else {
      // Something went wrong during initialization
    }
}];
Swift:
Smooch.initWith(SKTSettings(integrationId: "YOUR_INTEGRATION_ID")) { (error: Error?, userInfo: [AnyHashable : Any]?) in
    if (error == nil) {
      // Your code after init is complete
    } else {
      // Something went wrong during initialization
    }
}Displaying the conversation interface
Once you’ve initialized the SDK, you’re ready to try it out.
Find a suitable place in your app’s interface to invoke and use the code below to display the user interface. You can bring up whenever you think that your user will need access to help or a communication channel to contact you.
Objective-C:
[Smooch show];Swift:
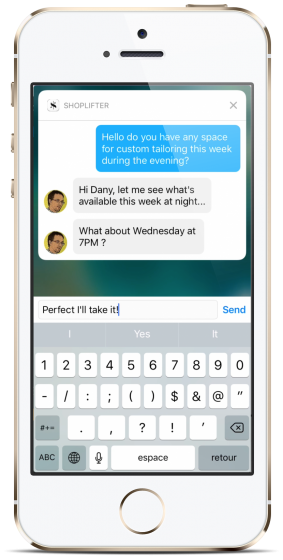
Smooch.showConversation(from: self)Starting Text
To prefill the text box in the conversation when opening it, simply supply a starting text string when calling the code to display the user interface:
Objective-C:
[Smooch showWithStartingText:@"Hi there! Can you help me please?"];Swift:
Smooch.show(withStartingText: "Hi there! Can you help me please?")Conversation List
To display a list of conversations, you can use the code below.
Objective-C:
[Smooch showConversationList];Swift:
Smooch.showConversationList(from: self)Login with externalId and JWT
After the SDK has been initialized, your user can start sending messages right away. These messages will show up on the business side as a new user. However, these users will not yet be associated to any user record you might have in an existing user directory.
If your application has a login flow, or if a user needs to access the same conversation from multiple devices, this is where the login method comes into play. You can associate users with your own user directory by assigning them an externalId. You will then issue each user a jwt credential during the login flow. You can read more about this in the Authenticating users section.
Authentication delegate
The iOS SDK offers an SKTAuthenticationDelegate which will be called when an invalid authentication token has been sent to Sunshine Conversations. It allows you to provide a new token for all subsequent requests. The request that originally failed will be retried up to five times. To set the delegate, set it in the SKTSettings object when initializing the SDK:
Objective-C:
SKTSettings *settings = [[SKTSettings alloc] init];
settings.authenticationDelegate = authDelegate;
[Smooch initWithSettings:settings completionHandler:completionHandlerBlock];
When authDelegate is an instance that conforms to the SKTAuthenticationDelegate protocol.
For example:
@interface MyAuthenticationDelegate() <SKTAuthenticationDelegate>

@end

@implementation MyAuthenticationDelegate
/**
 *  Notifies the delegate of a failed request due to invalid credentials
 *  @param completionHandler callback to invoke with a new token
 */
- (void)onInvalidToken:(void (^)(NSString *))completionHandler
{
  // retrieve new token
  completionHandler(updatedToken);
}

@end
Swift:
let settings = SKTSettings(integrationId: "your_integration_id")
settings.authenticationDelegate = authDelegate
Smooch.initWith(settings)
When authDelegate is an instance that conforms to the SKTAuthenticationDelegate protocol.
For example:
final class AuthDelegate: NSObject, SKTAuthenticationDelegate {
  func onInvalidToken(_ error: Error, handler completionHandler: @escaping SKTAuthenticationCompletionBlock) {
    // retrieve new token
    completionHandler(updatedToken)
  }
}
See Expiring JWTs on SDKs for more information.
Updating the framework
CocoaPods
To update via cocoapods, simply execute this:
$ pod updateCarthage
To update Carthage dependencies, you can simply run:
$ carthage update --use-xcframeworksConfiguring push notifications
Push notifications are a great, unobtrusive way to let your users know that a reply to their message has arrived.
Step 1. Enable Push Notifications and Generate the .p12 Certificate
For the steps below, you must be logged in to your Apple Developer account. If you don’t have a developer account yet, you can enroll here.
-
Log in to Apple Developer Member Center, and navigate to the certificates list.
-
Click the
+button at the top of the page to create a new certificate, and selectApple Push Notification service SSL (Sandbox & Production). -
Select your app ID from the dropdown and click continue.
-
Follow the instructions to generate a Certificate Signing Request (CSR) using Keychain Access, and upload it to generate your certificate.
-
Once the certificate is ready, download it to your computer and double-click it to open it in Keychain Access.
-
Right click on the certificate you created, and select
Export "Apple Push Services: {your-app-id}". -
Choose a password, if desired, and save the
.p12file to your computer.
Step 2. Upload the .p12 file to Sunshine Conversations
-
Go to the iOS integration page.
-
Click on the Connect or Configure button.
-
Upload the
.p12file.
Step 3. Re-create your Provisioning Profile
Now that you have enabled push notifications for your app, you must re-create your Provisioning Profile. You can not use the one you’ve used in the past.
-
Go to Provisioning Profiles in the Apple Developer Member Center by clicking here.
-
Click the
+button to add a new provisioning profile and follow the on-screen instructions. -
Notice that once you created the new provisioning profile, it shows that “Push Notifications” is an enabled service. Download the new profile.
-
Double click it to install it. It should now be selectable in Xcode for your app.
-
Build your app.
Step 4. Test it out!
-
Kill and restart your app.
-
Launch the Sunshine Conversations SDK.
-
Send a message to trigger the push notifications prompt. Important! If the user has not yet granted notification permissions for your app, you must resend a message after uploading the
.p12file. -
Reply to the message from the Business System integration of your choice
You’ll receive a notification if you’re in the app, or outside the app!
Rich Notifications
On iOS 10 and above, it’s now possible to display a custom user interface when the user interacts with your application’s remote and local notifications. Sunshine Conversations provides the ability to display the user’s conversation history when viewing a notification:
To enable this behaviour, sample code and configuration instructions can be found in the smooch-ios-rich-notifications repository.
Localization
Every string you see in the SDK can be customized and localized. A few languages are provided out of the box, but adding new languages is easy to do. When localizing strings, the SDK looks for SmoochLocalizable.strings in your app bundle before checking the Smooch bundle, enabling you to customize any strings and add support for other languages.
Enabling Localization in your app
To display a language other than English, your app needs to first enable support for that language. You can enable a second language in your Xcode project settings:
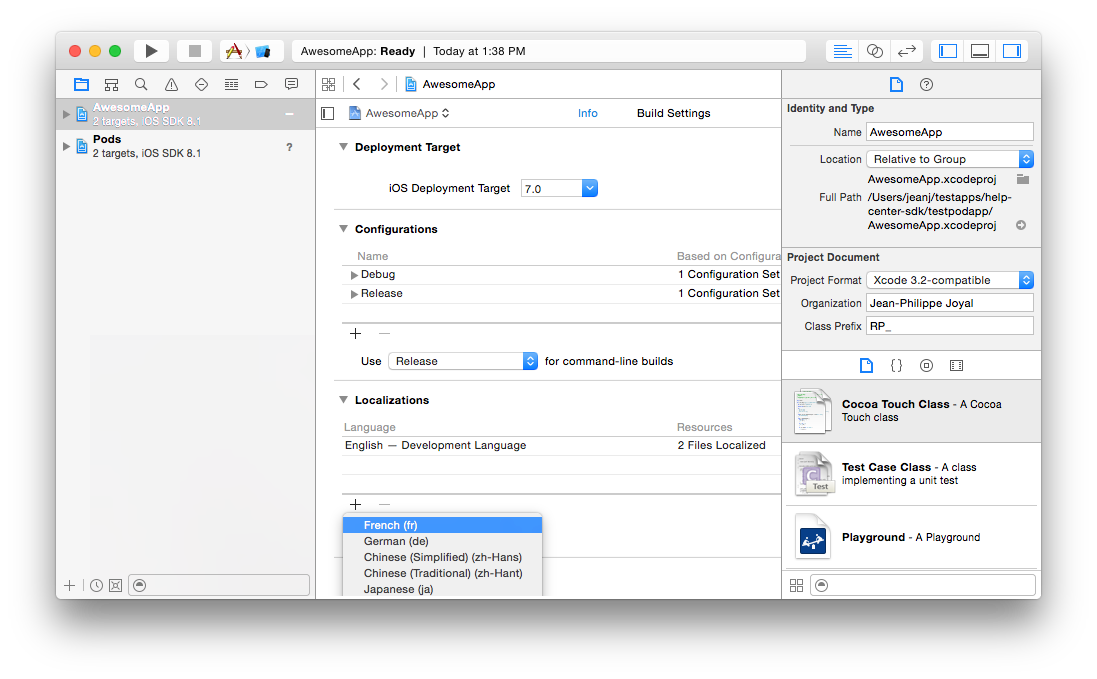
Once you have this, the UI will be displayed in the device language for the supported language.
The iOS SDK has partial translations available that have been provided by the community in the following languages: Arabic, English, Finnish, French, German, Italian, Japanese, Korean, Mandarin Chinese (traditional and simplified), Persian, Portuguese (Brazil and Portugal), Russian, Slovenian, Spanish, and Swedish.
See how to support more languages in Adding more languages.
If you would like to submit translations so that they are included in future SDK releases, you are welcome to open a Pull Request with the updated translations. See Adding more languages for more information.
Adding more languages
To enable other languages beside the provided ones, first copy the english SmoochLocalizable.strings file from the Smooch bundle to the corresponding .lproj folder for that language. Then, translate the values to match that language.
Customization
Strings customization
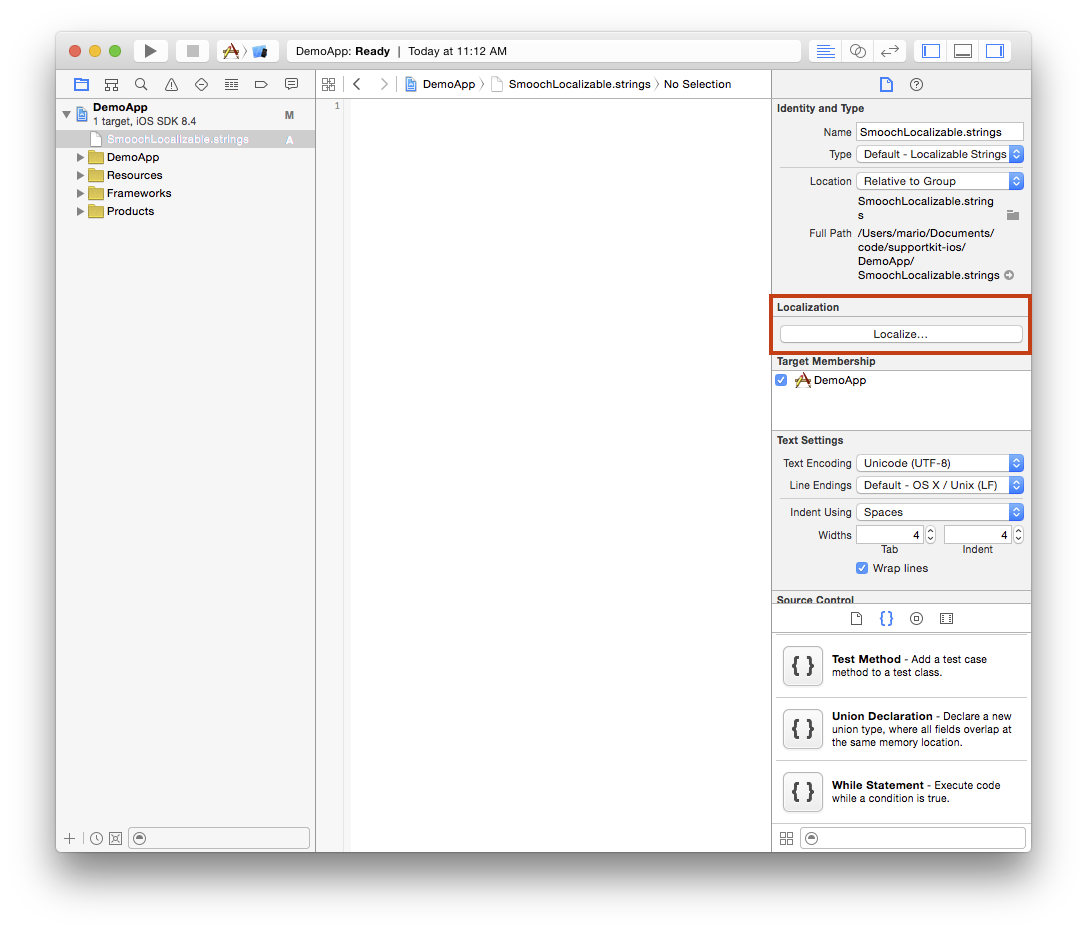
The iOS SDK lets you customize any strings it displays via Apple’s localization mechanism. To override one or more strings, add an empty string file named SmoochLocalizable.strings in your Xcode project and specify new values for the keys you would like to override. For example, to change the “Messages” header and the “Done” button, create a file with these contents:
"Messages" = "My Messages";

"Done" = "I'm Done";
The full set of keys is listed below. To enable string customization across languages, make sure you “Localize” your SmoochLocalizable.strings file in Xcode.
/* Nav bar button, action sheet cancel button */
"Cancel" = "...";

/* Conversation title */
"Messages" = "...";

/* Conversation header. Uses CFBundleDisplayName */
"This is the start of your conversation with the %@ team. We'll stay in touch to help you get the most out of your app.\nFeel free to leave us a message about anything that’s on your mind. We’ll get back to your questions, suggestions or anything else as soon as we can." = "...";

/* Conversation header when there are previous messages */
"Show more..." = "...";

/* Conversation header when fetching previous messages */
"Retrieving history..." = "...";

/* Error message shown in conversation view */
"No Internet connection" = "...";

/* Error message shown in conversation view */
"Could not connect to server" = "...";

/* Error message shown in conversation view */
"An error occurred while processing your action. Please try again." = "...";

/* Error message shown in conversation view */
"Reconnecting..." = "...";

/* Error message shown in conversation view */
"Invalid file" = "...";

/* Error message shown in conversation view */
"A virus was detected in your file and it has been rejected" = "...";

/* Error message shown in conversation view. Parameter represents the max file size formatted by NSByteCountFormatter */
"Max file size limit exceeded %@." = "...";

/* Fallback used by the in app notification when no message author name is found */
"%@ Team" = "...";

/* Conversation send button */
"Send" = "...";

/* Conversation text input place holder */
"Type a message..." = "...";

/* Conversation nav bar left button */
"Done" = "...";

/* Failure text for chat messages that fail to upload */
"Message not delivered. Tap to retry." = "...";

/* Failure text for user notification replies that fail to upload */
"Message not delivered. Please try again later." = "...";

/* Status text for chat messages */
"Sending..." = "...";

/* Status text for sent chat messages */
"Delivered" = "...";

/* Status text for chat messages seen by the appMaker */
"Seen" = "...";

/* Timestamp text for recent messages */
"Just now" = "...";

/* Timestamp text for messages in the last hour */
"%.0fm ago" = "...";

/* Timestamp text for messages in the last day */
"%.0fh ago" = "...";

/* Timestamp text for messages in the last week */
"%.0fd ago" = "...";

/* Action sheet button label */
"Take Photo" = "...";

/* Action sheet button label */
"Photo & Video Library" = "...";

/* Action sheet button label */
"Upload Document" = "...";

/* Action sheet button label */
"Share Location" = "...";

/* Photo confirmation alert title */
"Confirm Photo" = "...";

/* Action sheet button label */
"Resend" = "...";

/* Action sheet button label */
"View Image" = "...";

/* Message displayed in message bubble when image is not available */
"Tap to view%@ image" = "...";

/* Message displayed in message bubble when image is not available */
"Preview not available" = "...";

/* Error displayed in message bubble if image failed to download */
"Tap to reload image" = "...";

/* Error displayed as message if location sending fails */
"Could not send location" = "...";

/* Message displayed for unknown message types */
"Unsupported message type" = "...";

/* Message displayed for unknown action types */
"Unsupported action type" = "...";

/* Title displayed for unknown action types */
"Error" = "...";

/* Error title when user selects "use latest photo", but no photos exist */
"No Photos Found" = "...";

/* Error description when user selects "use latest photo", but no photos exist */
"Your photo library seems to be empty." = "...";

/* Error title when user attempts to upload a photo but Photos access is denied */
"Can't Access Photos" = "...";

/* Error description when user attempts to upload a photo but Photos access is denied */
"Make sure to allow photos access for this app in your privacy settings." = "...";

/* Error title when user attempts to take a photo but camera access is denied */
"Can't Access Camera" = "...";

/* Error description when user attempts to take a photo but camera access is denied */
"Make sure to allow camera access for this app in your privacy settings." = "...";

/* Generic error title when user attempts to upload an image and it fails for an unknown reason */
"Can't Retrieve Photo" = "...";

/* Generic error description when user attempts to upload an image and it fails for an unknown reason */
"Please try again or select a new photo." = "...";

/* Error title when user attempts to send the current location but location access is denied */
"Can't Access Location" = "...";

/* Error description when user attempts to send the current location but location access is denied */
"Make sure to allow location access for this app in your privacy settings." = "...";

/* UIAlertView button title to link to Settings app */
"Settings" = "...";

/* UIAlertView button title to dismiss */
"Dismiss" = "...";

/* Title for payment button */
"Pay Now" = "...";

/* Title for message action when payment completed */
"Payment Completed" = "...";

/*
 Instructions for entering credit card info. Parameters are as follows:
 1. Amount (e.g. 50.45)
 2. Currency (e.g. USD)
 3. App name (Uses CFBundleDisplayName)
*/
"Enter your credit card to send $%@ %@ securely to %@" = "...";

/* Error text when payment fails */
"An error occurred while processing the card. Please try again or use a different card." = "...";

/* Button label for saved credit card view */
"Change Credit Card" = "...";

/*
Information label for saved credit card view. Parameters are as follows:
1. Amount (e.g. 50.45)
2. Currency (e.g. USD)
3. App name (Uses CFBundleDisplayName)
 */
"You're about to send $%@ %@ securely to %@" = "...";

/* Title for user notification action */
"Reply" = "...";

/* Date format used for message grouping headers on the conversation screen */
"MMMM d, h:mm a" = "MMMM d, h:mm a";

/* Date format used for message timestamps on the conversation screen */
"hh:mm a" = "hh:mm a";

/* Error message when the content of a webview fails to load */
"Failed to open the page" = "...";

/* Timestamp text for messages received in the last minute on the conversation screen */
"1 minute ago" = "...";

/* Timestamp text for messages received between 1 minute and 1 hour ago on the conversation screen */
"%ld minutes ago" = "...";

/* Timestamp text for messages received between 1 and 2 hours ago on the conversation screen */
"1 hour ago" = "...";

/* Timestamp text for messages received between 2 and 24 hours ago on the conversation screen */
"%ld hours ago" = "...";

/* Timestamp text for messages received between 24 and 48 hours ago on the conversation screen */
"Yesterday" = "...";

/* Conversation list title */
"My Conversations" = "...";

/* Conversation list empty view text */
"No conversations" = "...";

/* Text used in the unread badge when there are more than 9 unread messages */
"9+" = "...";

/* Text used as a preview when a file is sent */
"%@ sent a file" = "...";

/* Text used as a preview when a image is sent */
"%@ sent an image" = "...";

/* Text used as a preview when a form is sent */
"%@ sent a form" = "...";

/* Text used as a preview when some other message type that is not file, image, form or text is sent */
"%@ sent a message" = "...";

/* Text used as a preview when no message has been sent */
"No Messages" = "...";

/* Text used as a prefix by messages sent by the current app user. */
"You" = "...";

/* Text used to notify user an error has occured loading a conversation from the conversation list screen. */
"Failed to load conversation" = "...";

/* Create Conversation Button Title */
"Create conversation" = "...";

/* Text used to notify user an error has occured creating a conversation from the conversation list screen. */
"Failed to create conversation" = "...";
Styling the Conversation Interface
The style of the conversation user interface can be controlled through two techniques:
- Using the
UIAppearanceproxy ofUINavigationBarto style the navigation bar’s color and appearance. - The
SKTSettingsclass provides access to the status bar and the color of the message bubbles and its text.
Suppose you wanted the conversation UI to have a black navigation bar and red message bubbles with white text. First, you’d use UINavigationBar’s appearance proxy to set up the navigation bar. Then, you’d use SKTSettings to finish styling the UI:
Objective-C:
SKTSettings* settings = [SKTSettings settingsWithIntegrationId:@"YOUR_INTEGRATION_ID"];
settings.conversationAccentColor = [UIColor redColor];
settings.userMessageTextColor = [UIColor whiteColor];
settings.conversationStatusBarStyle = UIStatusBarStyleLightContent;

// Make the navigation bar's title with red text.
if (@available(iOS 13.0, *)) {
    UINavigationBarAppearance *appearance = [[UINavigationBarAppearance alloc] init];
    [appearance configureWithOpaqueBackground];
    [appearance setBackgroundColor:[UIColor systemRedColor]];
    [appearance setTitleTextAttributes:@{ NSForegroundColorAttributeName: [UIColor systemRedColor] }];

    UIBarButtonItemAppearance *buttonAppearance = [[UIBarButtonItemAppearance alloc] init];
    [buttonAppearance.normal setTitleTextAttributes:@{ NSForegroundColorAttributeName: [UIColor systemRedColor] }];

    UIBarButtonItemAppearance *doneButtonAppearance = [[UIBarButtonItemAppearance alloc] init];
    [buttonAppearance.normal setTitleTextAttributes:@{ NSForegroundColorAttributeName: [UIColor systemYellowColor] }];

    appearance.buttonAppearance = buttonAppearance;
    appearance.doneButtonAppearance = doneButtonAppearance;
    appearance.backButtonAppearance = doneButtonAppearance;

    UINavigationBar.appearance.standardAppearance = appearance;
    UINavigationBar.appearance.scrollEdgeAppearance = appearance;
    UINavigationBar.appearance.compactAppearance = appearance;
    if (@available(iOS 15.0, *)) { // For compatibility with earlier iOS.
        UINavigationBar.appearance.compactScrollEdgeAppearance = appearance;
    }
} else {
    // Fallback on earlier versions
    [UINavigationBar.appearance setBarTintColor: [UIColor blackColor]];
    [UINavigationBar.appearance setTintColor: [UIColor redColor]];
    [UINavigationBar.appearance setTitleTextAttributes:@{ NSForegroundColorAttributeName : [UIColor redColor] }];
}
Swift:
var settings = SKTSettings(integrationId: "YOUR_INTEGRATION_ID")
settings.conversationAccentColor = .red
settings.userMessageTextColor = .white
settings.conversationStatusBarStyle = .lightContent

if #available(iOS 13.0, *) {
    let appearance = UINavigationBarAppearance()
    appearance.configureWithOpaqueBackground()
    appearance.backgroundColor = .systemRed
    appearance.titleTextAttributes = [.foregroundColor: UIColor.systemGreen]

    let buttonAppearance = UIBarButtonItemAppearance()
    buttonAppearance.normal.titleTextAttributes = [.foregroundColor: UIColor.systemGreen]

    let doneButtonAppearance = UIBarButtonItemAppearance()
    doneButtonAppearance.normal.titleTextAttributes = [.foregroundColor: UIColor.systemYellow]

    appearance.buttonAppearance = buttonAppearance
    appearance.doneButtonAppearance = doneButtonAppearance
    appearance.backButtonAppearance = doneButtonAppearance

    UINavigationBar.appearance().standardAppearance = appearance
    UINavigationBar.appearance().scrollEdgeAppearance = appearance
    UINavigationBar.appearance().compactAppearance = appearance
    if #available(iOS 15.0, *) { // For compatibility with earlier iOS.
        UINavigationBar.appearance().compactScrollEdgeAppearance = appearance
    }
} else {
    // Fallback on earlier versions
    UINavigationBar.appearance().barTintColor = .green
    UINavigationBar.appearance().tintColor = .orange
    UINavigationBar.appearance().titleTextAttributes = [.foregroundColor : UIColor.red]
}
User Accessibility
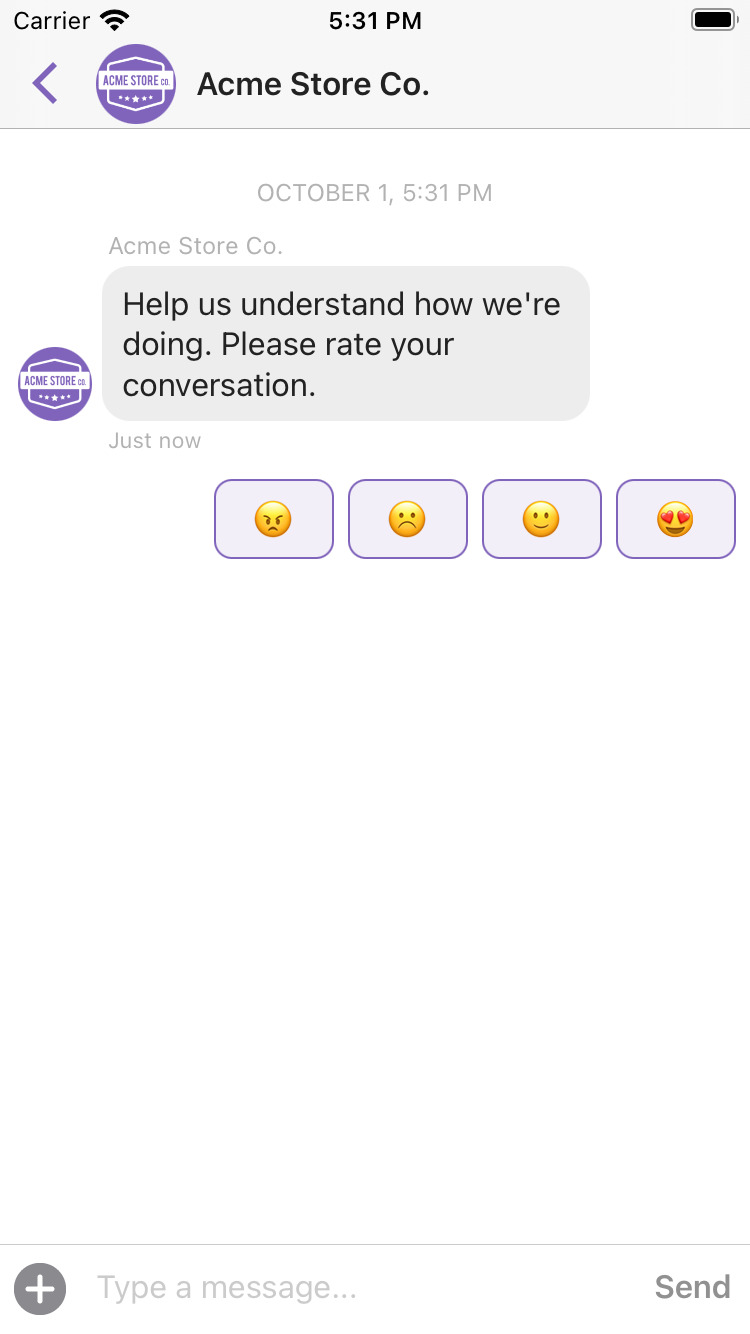
To ensure compliance with accessibility standards, the SDK has received a comprehensive update that includes numerous enhancements throughout the SDK. One notable change is the addition of 4% transparency for the background colour in the Quick Replies UI component. While this change improves the appearance of the Quick Replies and enhances visibility and accessibility for users, it is important to note that many other UI components have been improved, resulting in a more user-friendly experience overall.
Additionally, as an integrator, you are responsible for providing colours selections that comply with accessibility guidelines to ensure an inclusive user experience.
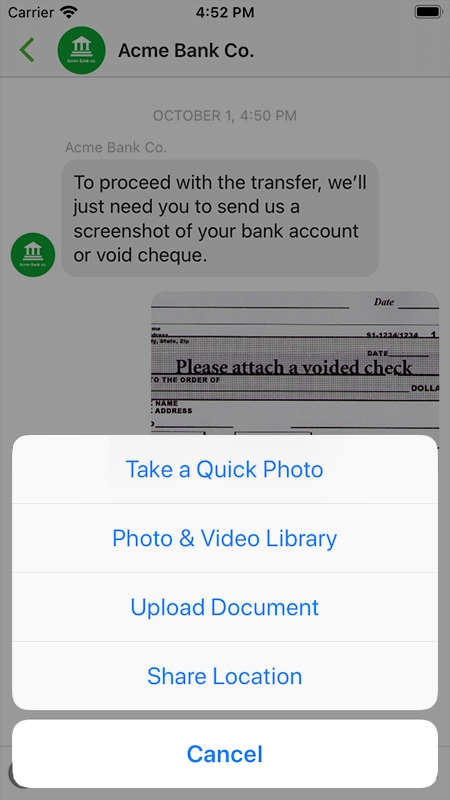
Menu items
The iOS SDK features a tappable menu icon that allows the user to send various message types. The types displayed in this menu can be customized, or the menu can be hidden altogether.
If you want to control this menu, override the allowedMenuItems array in SKTSettings to add the values of your choice:
SKTSettings *settings = [SKTSettings settingsWithIntegrationId:@"your_integration_id"];
settings.allowedMenuItems = @[
                                SKTMenuItemCamera,
                                SKTMenuItemGallery,
                                SKTMenuItemDocument,
                                SKTMenuItemLocation
                            ];
To hide the menu completely, set the allowedMenuItems array to nil:
SKTSettings *settings = [SKTSettings settingsWithIntegrationId:@"your_integration_id"];
settings.allowedMenuItems = nil;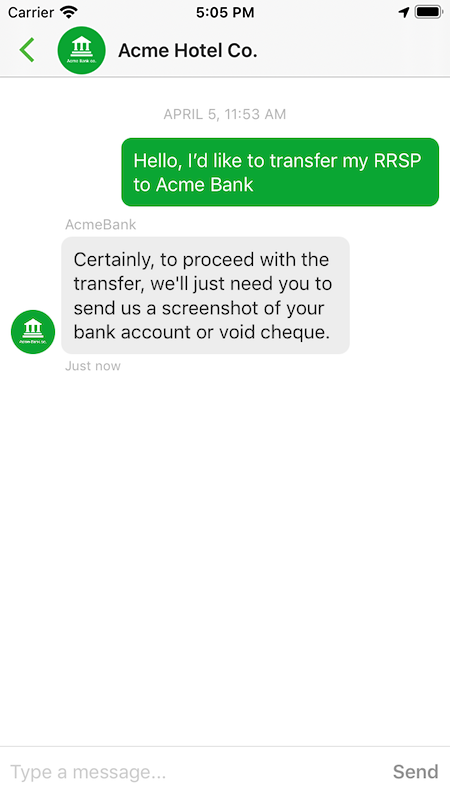
Implementing your own User Interface
If you need more customization options than the ones supported natively by the SDK, you can implement a complete custom UI by leveraging events and APIs exposed by the SDK, which will continue to facilitate the connection with the Sunshine Conversations platform.
Our sample custom UI project covers the first steps you need to follow to get started.