 for the latest updates.
Home
Programmable Conversations
Users
API Authentication
Sunshine Conversations Connect
References
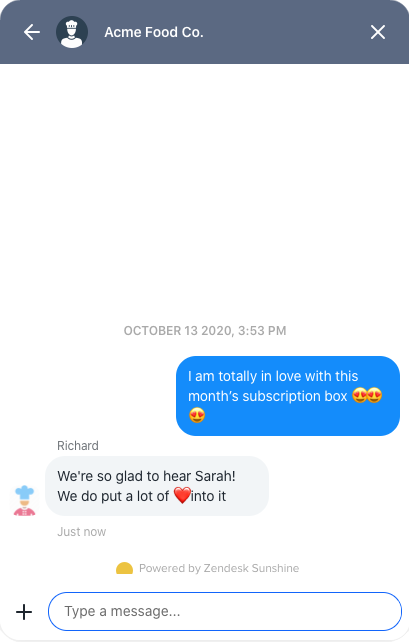
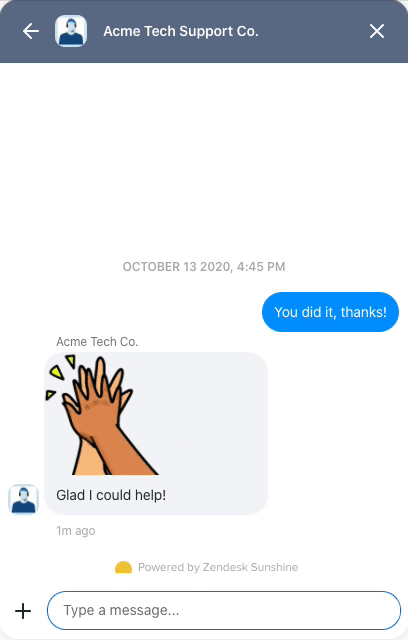
Web Messenger
The Sunshine Conversations Web Messenger is a highly customizable messaging widget that can be added to any web page. Web Messenger is unique in that it allows the user seamlessly move the conversation beyond the browser to a persistent channel like SMS, Facebook Messenger, or any other OTT channels.
Current version: v
- Capabilities
- Moving to other channels
- Browser support
- Integrating with Sunshine Conversations
- Authenticating users
- Customization
- Filtering and transforming messages
- Whitelisting Domains
Capabilities
The Web Messenger supports a wide variety of capabilities as seen in the channel capabilities grid. Below is a detailed view of each capabilities.
Content Types
Action Types
Structured Messages

Indicators

Delivery Events
Delivery events allow you to track deliveries of Sunshine Conversations messages to the Web Messenger by subscribing to the conversation:message:delivery:channel webhook. Sunshine Conversations also tracks user deliveries on the Web Messenger which let you confirm whether a message has reached the user by listening to the conversation:message:delivery:user webhook.
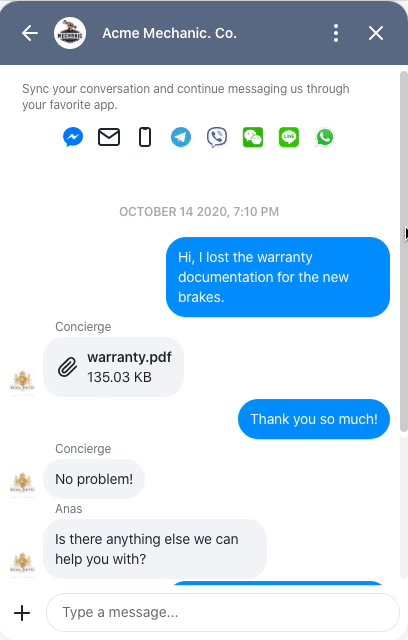
Conversation List

The conversation list allows a user to navigate easily between multiple conversations. In this view, the user can see the names, icons, timestamps and text previews of all conversations.
On initialization, the conversation list loads at most 10 conversations (more if bigger screens allow), ordered from most recently active to least. Users can load additional conversations by scrolling to the bottom of the list.
By default, users can also start new conversations from this view. Using the canUserCreateMoreConversations integration setting, the business can disallow users to create more conversations. In that case, if the users are only participating in a single conversation, they will not be able to view the conversation list.
It is also possible to completely disable the conversation list feature via the canUserSeeConversationList integration setting.
For more information on how to update your web integration, have a look at our API documentation.
Setting the conversation icon, name and description
At any point during the conversation, the business can choose to set or update the conversation iconUrl, displayName, and description, as well as any relevant custom metadata, both via our SDK Client API and REST API.
Unread Messages
![]()
When the user receives new messages, a badge containing the count of unread messages is displayed next to the conversation item in the conversation list view. If there are greater than 9 unread messages in a conversation the badge shows 9+. Additionally, any conversation items in the conversation list with unread messages are bolded.
The badge is removed when the messages are marked as read with the following user actions:
- Scroll to bottom of conversation
- Focus or type in the chat input
- Click on the Web Messenger header or badge
- Send a message from a linked channel
Note that unless the user sends a message from a linked channel, no other user actions may remove the badge while the user is either viewing the settings or the conversation list.
It is possible for the business to remove the badge by marking the messages as read using the markAllAsRead SDK API method, as well as sending a conversation:read activity by calling the Post Activity REST API endpoint.
An unreadCount event is triggered when the number of unread messages changes. The unreadCount information of the current user can also be found in the participant objects in the conversation.participants array.
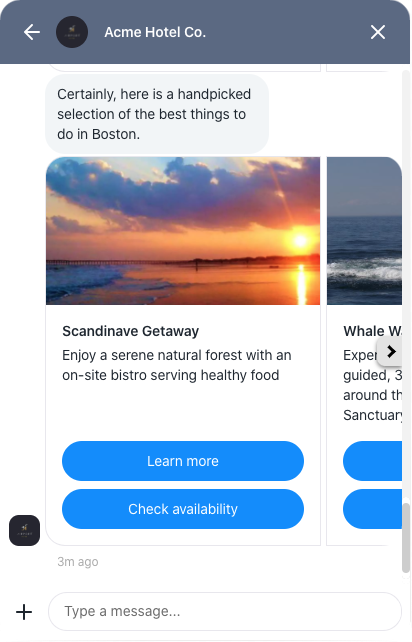
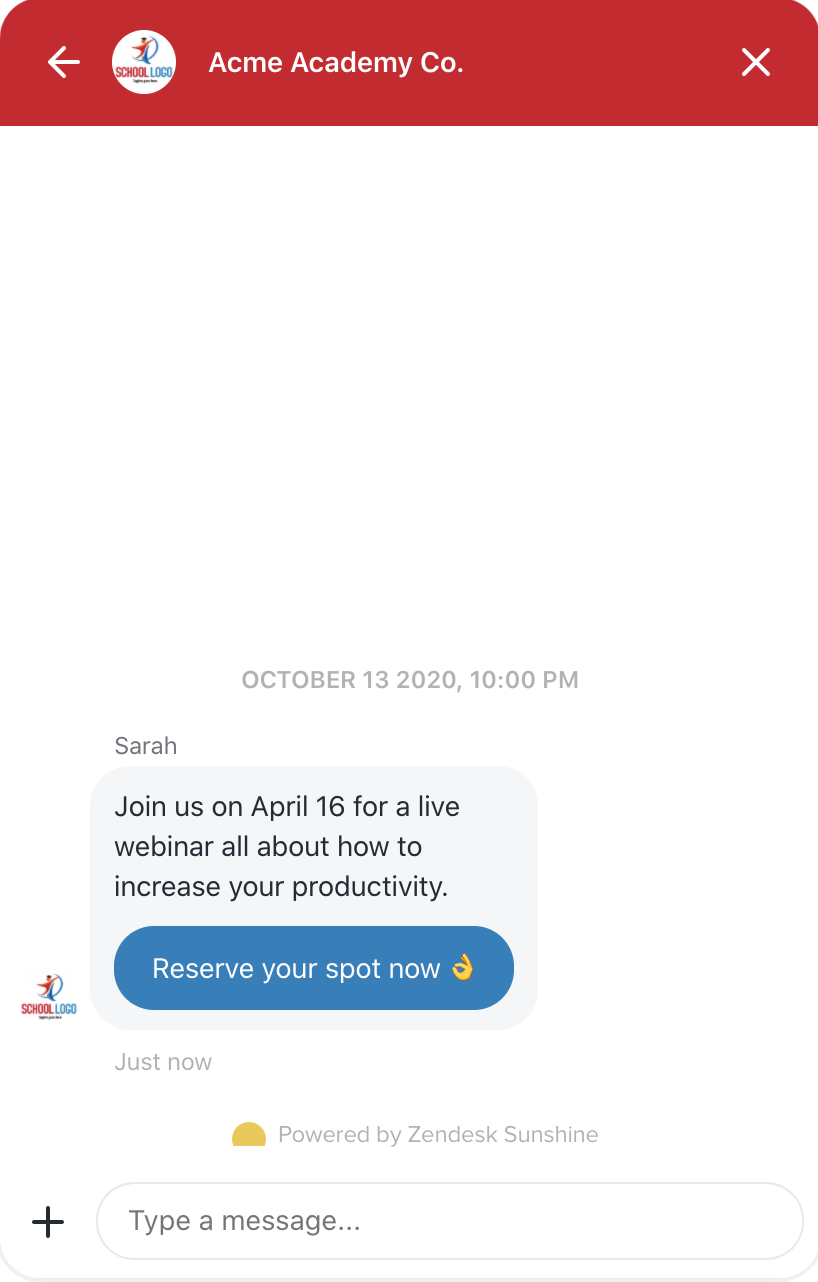
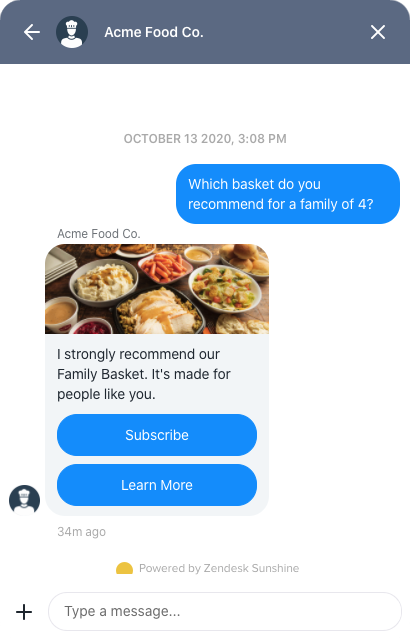
Carousel
Carousels are rendered natively with full functionality in the Web Messenger. See our API documentation for instructions on how to send one.
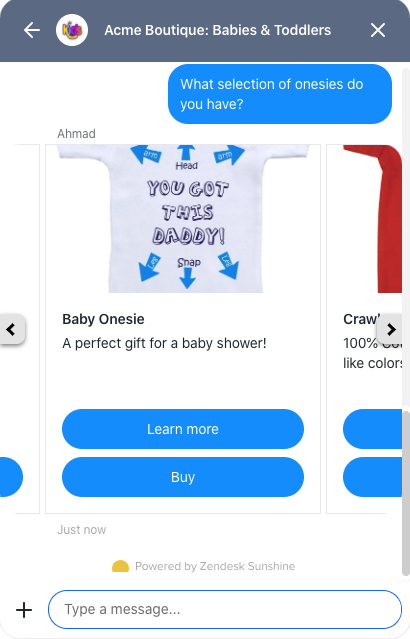
Carousel items
Carousels support up to a maximum of 10 message items. Each message item must include a title and at least one supported action. Optionally, an image and description can be included as well. Images can be displayed in two different aspect ratios, “square” and “horizontal”. For more information, see our API documentation.
Carousel items with “horizontal” images (default):
Carousel items with “square” images:
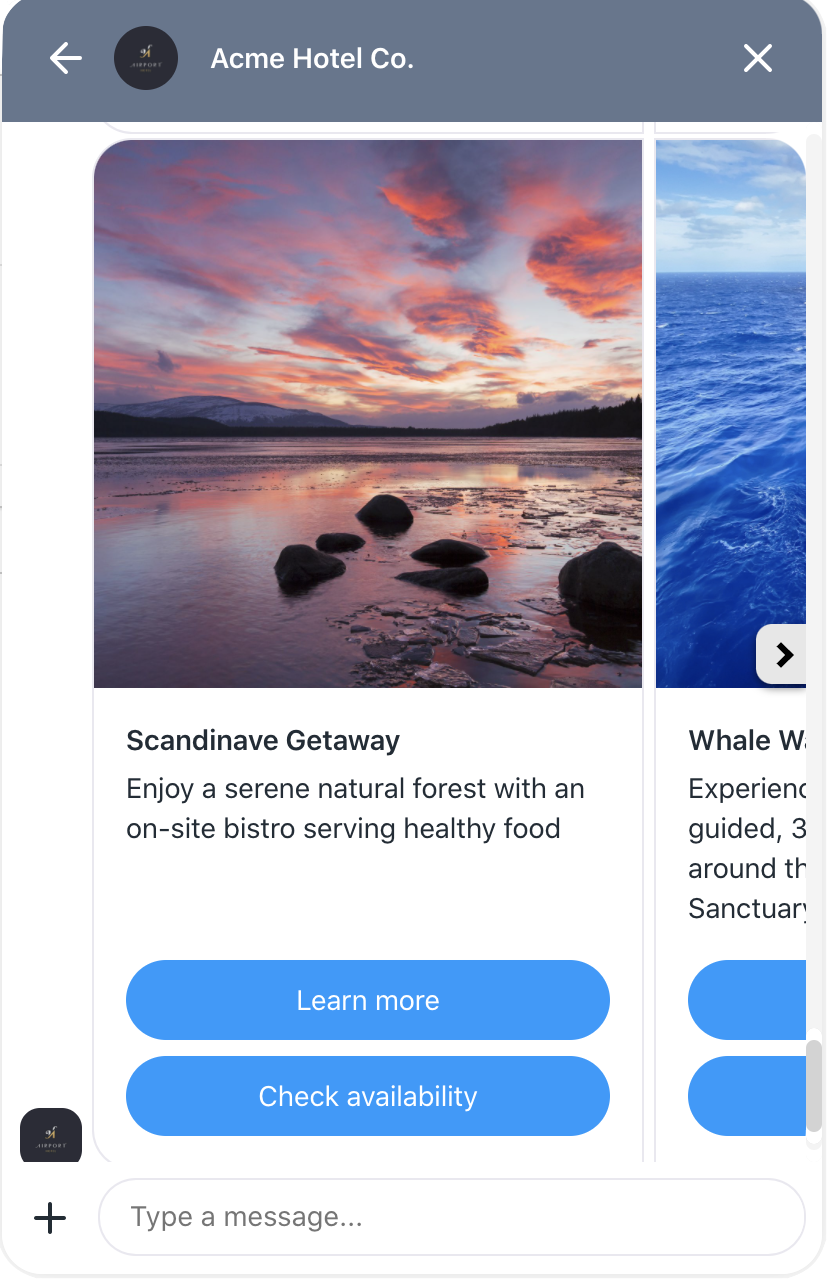
Supported actions
The Web Messenger supports the following action types in a carousel message item:
- Link
- Postback
- Buy
- Webview
List message fallback
If the Web Messenger receives a list type message, it will display a carousel instead.
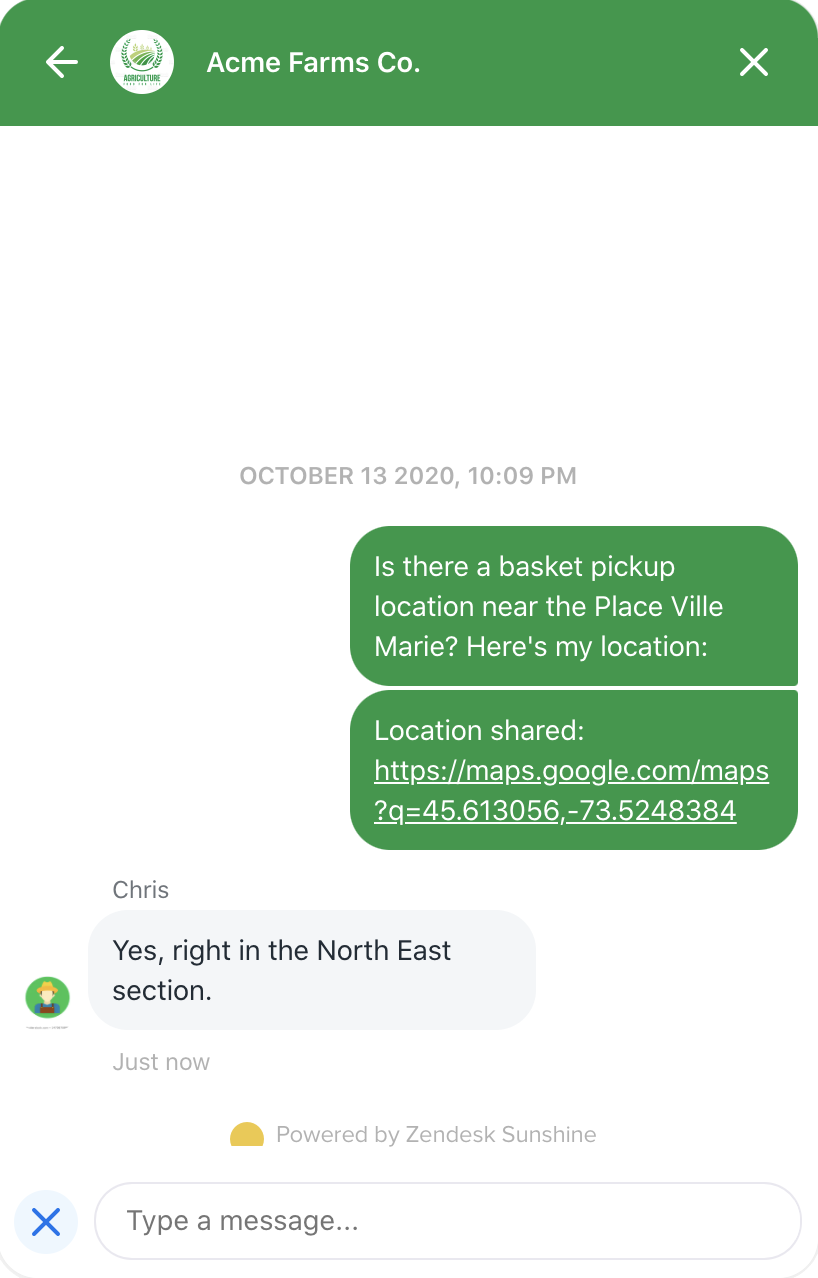
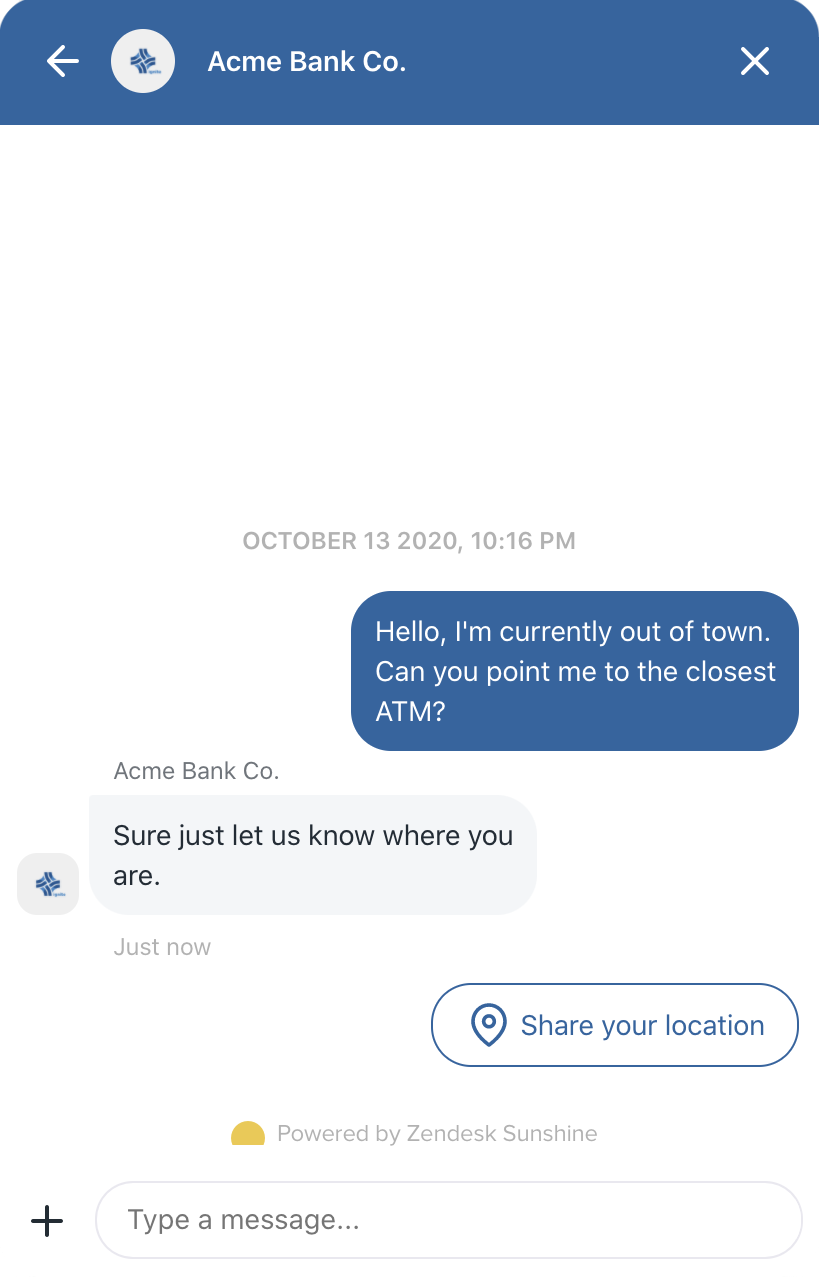
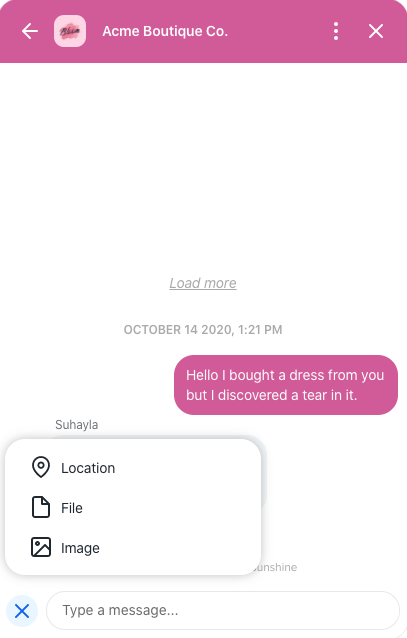
Location
Location messages are rendered as text with a Google Maps link of the location.
Users can send location messages as a response to a Location Request, or by using the Share Location button.
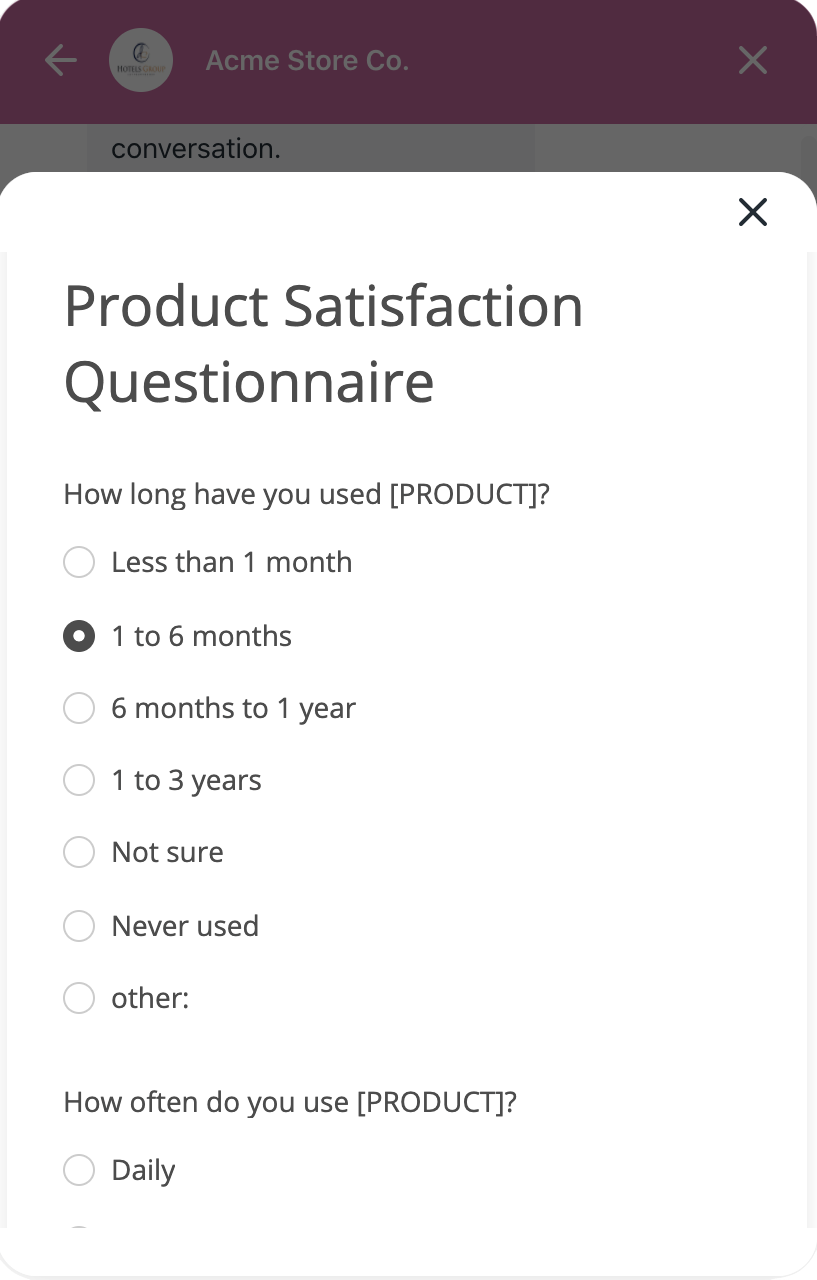
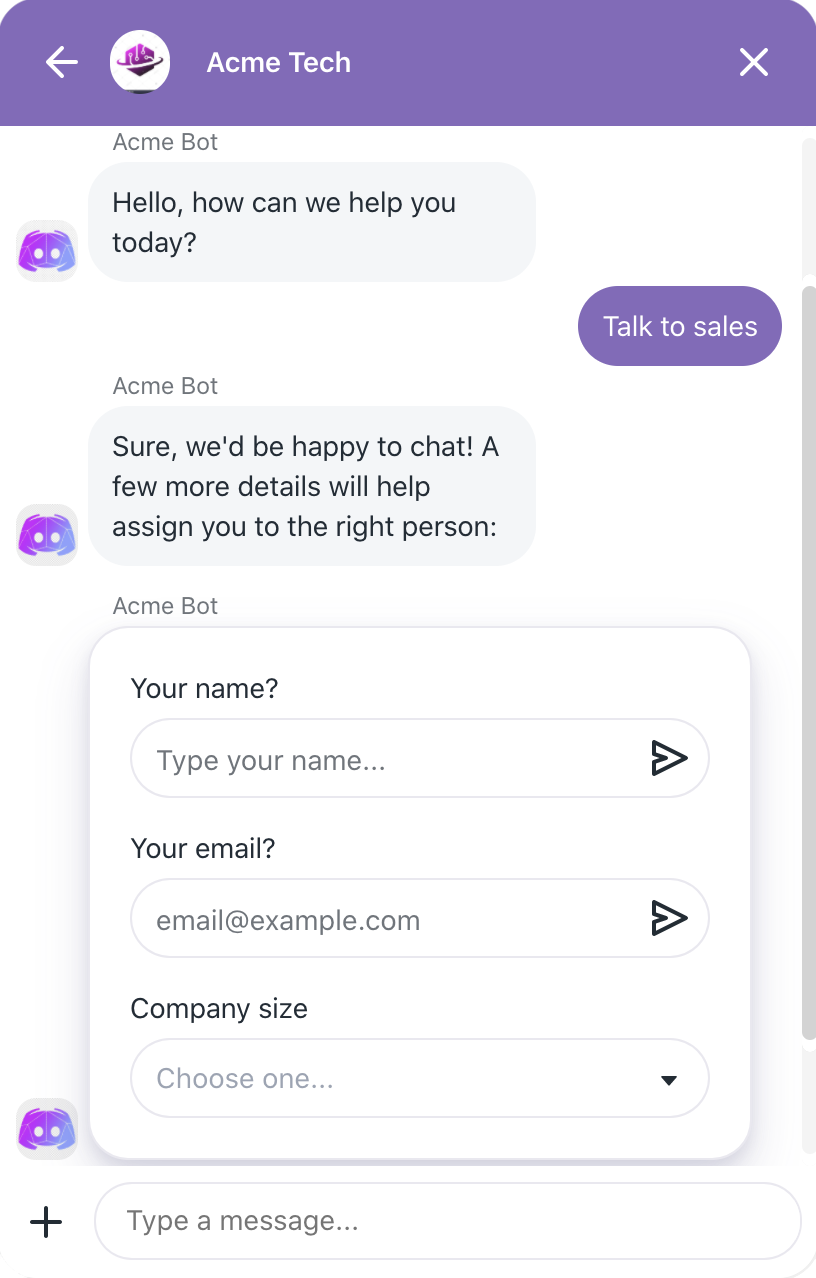
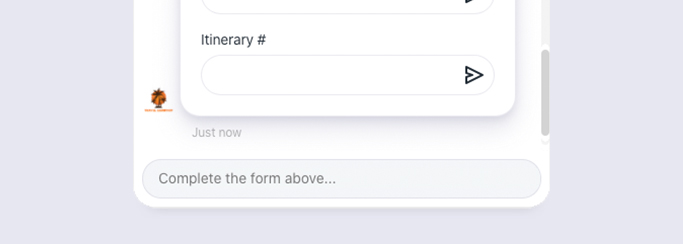
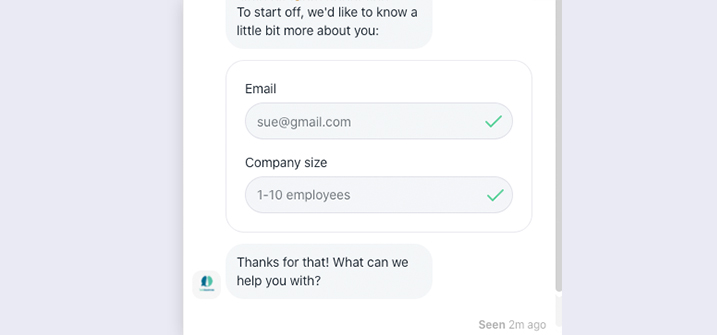
Forms
Form messages are rendered natively with full functionality in the Web Messenger and are a great way for you to capture user data.
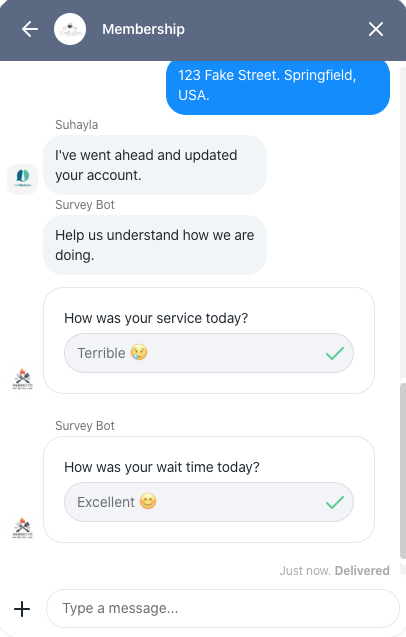
A form message may only be sent by the business via the Sunshine Conversations API or template syntax. It is also possible to block the conversation and resume it only once the user has fully filled out the form. See our API documentation for instructions on how to send one.
You can see it in action right now by using our example template syntax, %((template: lead_capture))%.
Form Fields
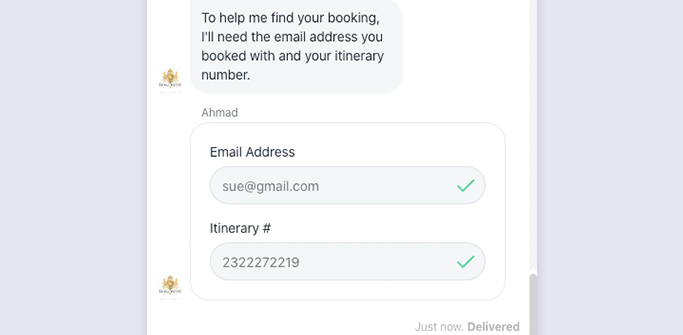
Forms fields are always required and may be of type text, email and select. Each field must include a name, a label and a type. An optional placeholder may be specified for each field type.
Fields of type text and email come with integrated validation. Text fields support up to 256 characters, and a different range may be specified using the optional field attributes minSize and maxSize. Email fields are validated according to RFC 5322.
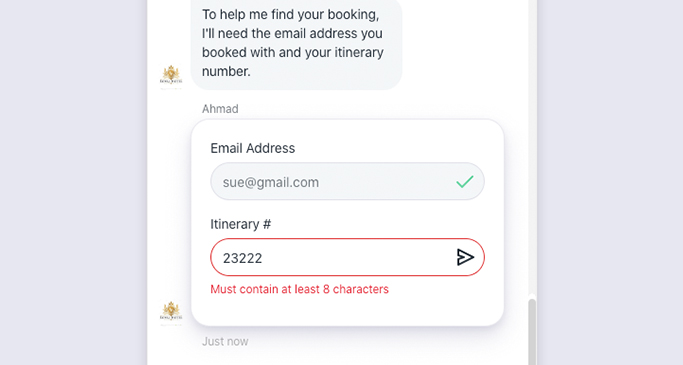
Forms support up to a maximum of 20 fields, with the select field supporting up to 100 options. Note that we currently support single selection only.
Receiving a Form Response
When a user fills the form, each field gets validated and locked. Once all fields are filled, a message of type formResponse is sent with the role user. The original business form becomes locked and gets updated, each field now containing the user’s answer.
For more information on the formResponse message type, see our API documentation.
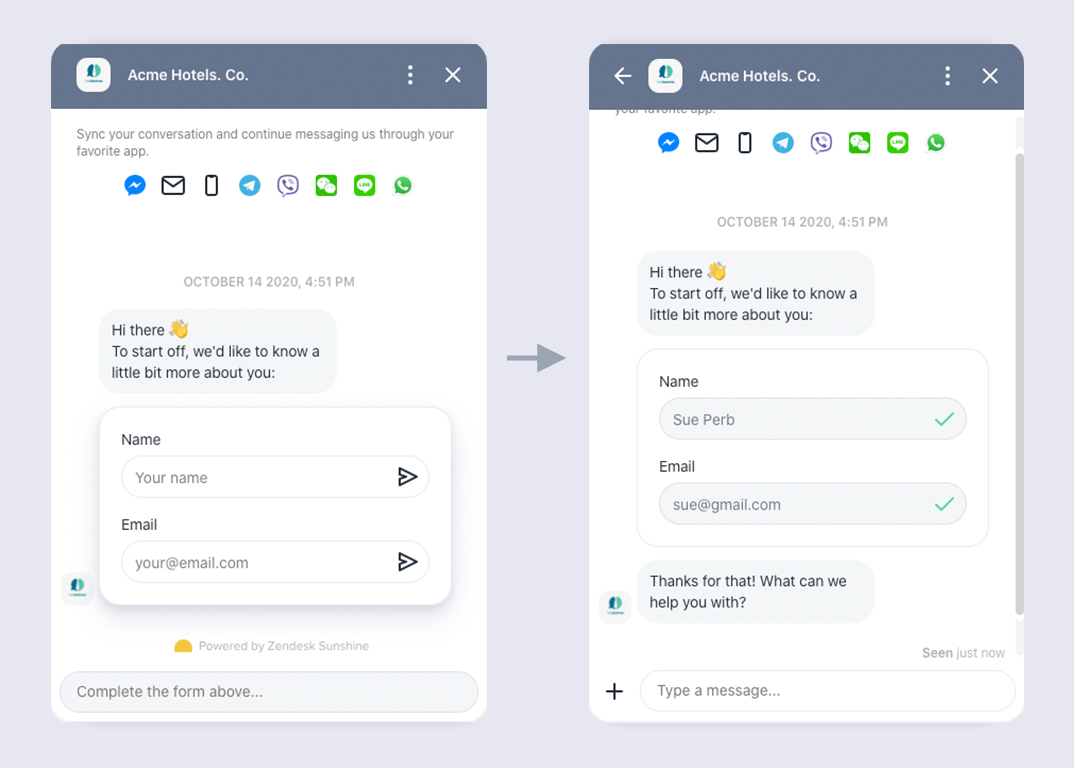
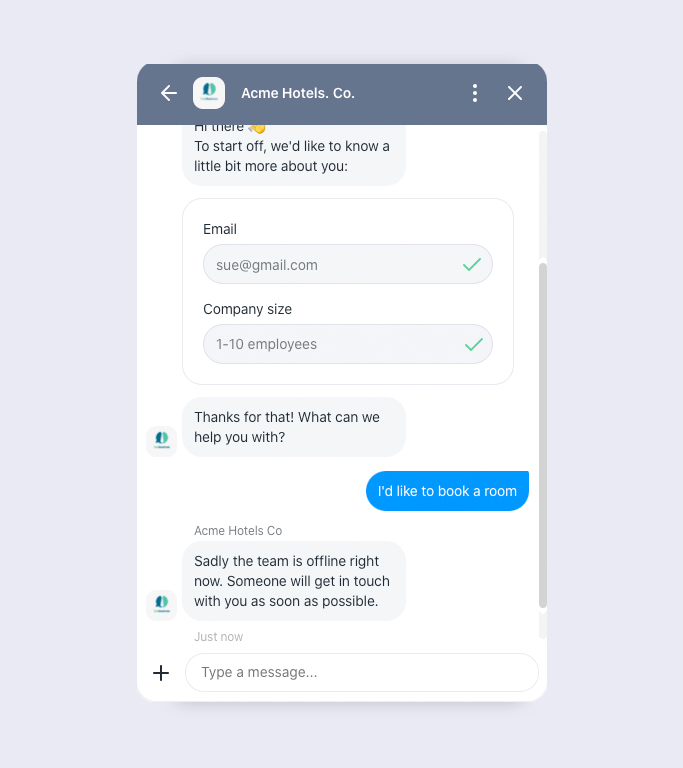
Prechat Capture
Prechat Capture is an add-on built by Sunshine Conversations which leverages our new form message type and allows you to capture a user’s name and email before the start of a conversation.
When enabled, the chat input is disabled and the user is greeted by a welcome message and a form asking for their name and email. Once the form is successfully submitted, a thank you message is sent to the user and the conversation is then initialized, connecting the user to your business.
If your Sunshine Conversations app has the Office Hours add-on enabled, the away message will be sent upon the first user message following the successful submission of the prechat capture form.
Configuration
To enable the prechat capture experience, simply do so via the Web SDK init parameter as follows:
<script>
    Smooch.init({
        integrationId: '<integration-id>',
        prechatCapture: {
            avatarUrl: 'http://domain.com/images/avatar.png',
            enabled: true,
            enableEmailLinking: true
        }
    }).then(
        function () {
            // Your code after init is complete
        },
        function (err) {
            // Something went wrong during initialization
        }
    );
</script>
Custom Prechat Capture
A custom Prechat Capture form may also be configured by setting the fields property to an array of form fields. For more information on fields, see our API documentation.
Note that if you specify custom fields and enable the enableEmailLinking option, the first field of type email will be used for the email linking process. If no such field exists, the linking will not happen.
Here is an example on how to set a custom Prechat Capture form:
<script>
    Smooch.init({
        integrationId: '<integration-id>',
        prechatCapture: {
            avatarUrl: 'http://domain.com/images/avatar.png',
            enabled: true,
            enableEmailLinking: true,
            fields: [
                {
                    type: 'email',
                    name: 'email',
                    label: 'Email',
                    placeholder: 'your@email.com'
                },
                {
                    type: 'text',
                    name: 'company-website',
                    label: 'Company website',
                    placeholder: 'mycompany.com'
                },
                {
                    type: 'select',
                    name: 'company-size',
                    label: 'Company size',
                    placeholder: 'Choose a number...',
                    options: [
                        {
                            name: '1-10',
                            label: '1-10 employees'
                        },
                        {
                            name: '11-50',
                            label: '11-50 employees'
                        },
                        {
                            name: '51+',
                            label: '51+ employees'
                        }
                    ]
                }
            ]
        }
    }).then(
        function () {
            // Your code after init is complete
        },
        function (err) {
            // Something went wrong during initialization
        }
    );
</script>
See our documentation on GitHub for more information on the different prechatCapture options.
Receiving the Response
Upon successful submission of the prechat capture form, a conversation is initialized with four messages:
- The Greeting message of type
text; - The Data Capture Form message of type
form; - The Confirmation message of type
text; and - The Data Capture Form Response message of type
formResponse.
You may handle those messages like you would handle any other Sunshine Conversations message.
Moving to other channels
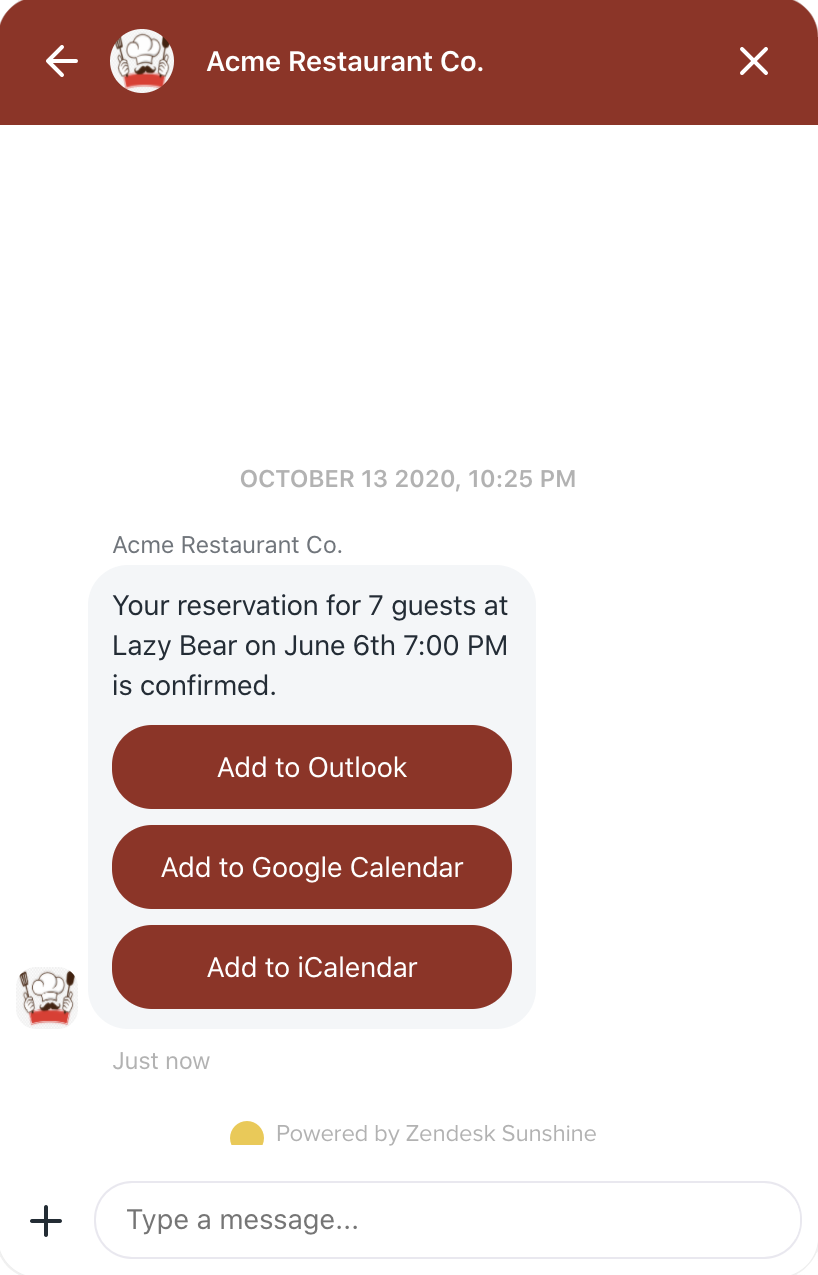
Web Messenger allows users to continue a conversation on the messaging app of their choosing. After sending their first message, they will be prompted to be notified inside other apps when they get a reply. This takes pressure off of the business to reply instantly and allows the user to close their browser session without having to worry about missing a response.
You can continue (link) only the default conversation.
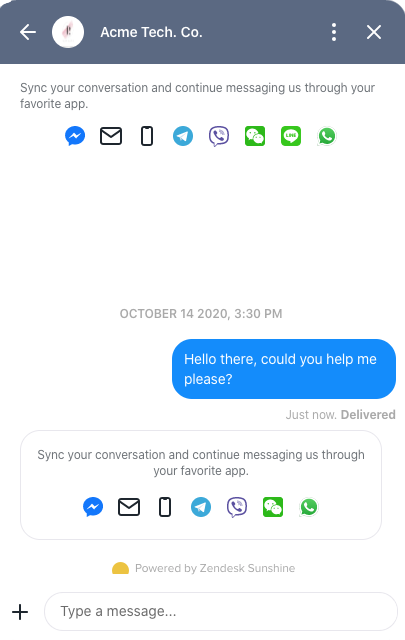
For example, if a user visits your site and would like to close the tab, they can choose to ‘Connect’ to Messenger. This will connect their conversation to Facebook Messenger and enable notifications there.
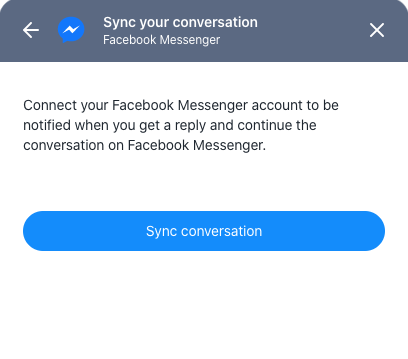
When you reply to your user, Sunshine Conversations will intelligently detect which messaging channel they most recently used and make sure they don’t get spammed with push notifications if they elect to be notified on multiple apps.
The current supported list of notifiable channels is as follows:
- Facebook Messenger
- Twilio
- MessageBird
- Telegram
- Viber
In order to offer these channels, simply integrate any you want and they will be added to the list by default. You may also edit that list through the Update Integration API.
Getting notified by email
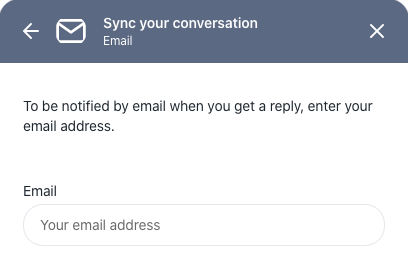
In order to maintain the privacy and security of your user’s conversations, when a user chooses to be notified over email, Sunshine Conversations will create a separate, isolated client for that email thread. Only future replies to that email thread will be added to that conversation. This mitigates the danger of a malicious user attempting to claim ownership of someone else’s address.
The email to conversation mapping follows this logic:
If a user emails your business:
- Future emails from that address (regardless of thread) will be routed to the same conversation.
If you link a given user to an address via the linking API:
- Future emails from that address (regardless of thread) will be routed to the same conversation.
If a user opts in to continue their conversation over email:
- Future emails sent from the notification email thread will be routed to the same conversation.
- Future emails sent from that address in a new thread will be routed to a new conversation.
Browser support
Web Messenger supports all popular browsers.
Desktop
- Chrome: Latest and one major version behind
- Edge: Latest and one major version behind
- Firefox: Latest and one major version behind
- Internet Explorer: 11+
- Safari: Latest and one major version behind
Mobile
- Stock browser on Android 4.1+
- Safari on iOS 8+
<meta name="viewport" content="width=device-width, initial-scale=1" />Other browsers
Web Messenger is likely compatible with other and older browsers but we only test against the versions above.
Integrating with Sunshine Conversations
There are two main ways to include the Sunshine Conversations Web Messenger on your web page. The easiest way to get started is using the HTML <script> tag, but you can also include it using npm.
Quick start
If you want to quickly incorporate Web Messenger into Sunshine Conversations, follow the steps below.
To view detailed instructions, see:
The above two instructions test the integration by accessing the HTML file directly using the filesystem. Accessing the HTML file directly might not be applicable to your situation but it provides an easy way to test your code.
HTML script tag method
To use the HTML <script> tag:
-
Add the following code towards the end of the
<head>element on your page and replace<integration-id>with your integration ID found in the Web Messenger settings page in Sunshine Conversations.<!-- prettier-ignore --> <script> !function(o,p,s,e,c){ var i,a,h,u=[],d=[];function t(){var t="You must provide a supported major version.";try{if(!c)throw new Error(t);var e,n="https://cdn.smooch.io/",r="smooch";if((e="string"==typeof this.response?JSON.parse(this.response):this.response).url){var o=p.getElementsByTagName("script")[0],s=p.createElement("script");s.async=!0;var i=c.match(/([0-9]+)\.?([0-9]+)?\.?([0-9]+)?/),a=i&&i[1];if(i&&i[3])s.src=n+r+"."+c+".min.js";else{if(!(4<=a&&e["v"+a]))throw new Error(t);s.src=e["v"+a]}o.parentNode.insertBefore(s,o)}}catch(e){e.message===t&&console.error(e)}}o[s]={init:function(){i=arguments;var t={then:function(e){return d.push({type:"t",next:e}),t},catch:function(e){return d.push({type:"c",next:e}),t}};return t},on:function(){u.push(arguments)},render:function(){a=arguments},destroy:function(){h=arguments}},o.__onWebMessengerHostReady__=function(e){if(delete o.__onWebMessengerHostReady__,o[s]=e,i)for(var t=e.init.apply(e,i),n=0;n<d.length;n++){var r=d[n];t="t"===r.type?t.then(r.next):t.catch(r.next)}a&&e.render.apply(e,a),h&&e.destroy.apply(e,h);for(n=0;n<u.length;n++)e.on.apply(e,u[n])};var n=new XMLHttpRequest;n.addEventListener("load",t),n.open("GET","https://"+e+".webloader.smooch.io/",!0),n.responseType="json",n.send() }(window,document,"Smooch","<integration-id>","5"); </script>Using the HTML
<script>tag also allows version pinning. Simply replace the"5"after<integration-id>with the specific version you would like to pin (for example, replace"5"with"4.29.21"). Alternatively, a major version can be specified (such as"4"or"5") to load the latest version of the specified major version. All versions4.0.0and later are supported. -
Once the Web Messenger has been included on your web page, initialize it using this code snippet in a .js file, and reference the .js file in the HTML file above.
Smooch.init({ integrationId: '<integration-id>' }).then(
    function () {
        // Your code after init is complete
    },
    function (err) {
        // Something went wrong during initialization
    }
);
NPM method
If you are using npm:
-
Install smooch using the following command:
$ npm install smooch -
Create a .js file and include the following snippet:
var Smooch = require('smooch');

Smooch.init({ integrationId: '<integration-id>' }).then(
    function () {
        // Your code after init is complete
    },
    function (err) {
        // Something went wrong during initialization
    }
);
Replace
<integration-id>with the integration ID found in the Web Messenger settings page in Sunshine Conversations. -
Reference the .js file in your HTML file, as defined by your implementation method.
Adding Web Messenger using HTML script tag
Before you add and configure the Web Messenger integration, create your HTML file. This example uses a very basic template named index.html.
<!DOCTYPE html>
<html>
    <head>
        <meta charset="UTF-8" />
        <title>Web Messenger</title>
    </head>
    <body></body>
</html>
Now add the Web Messenger channel:
-
In the Sunshine Conversations dashboard, click the app where you want to integrate Web Messenger or create a new one.
-
Click Connect Integrations.
-
Expand the Customer Channels section, select Web Messenger and click Connect.
-
Enter a unique name for this integration so you can easily find it.
-
Select Script Tag as the method to use for this integration.
-
Copy the code under Step 3: Include the Sunshine Conversations plugin on your web page and paste it near the end of the
<head>element of your HTML file.
-
Copy the code under Step 4: Initialize Sunshine Conversations with your integration Id and paste it near the end of the
<body>element of your HTML file.Your HTML file should look similar to this (the integration ID will correspond to your own installation):
<!DOCTYPE html>
<html>
    <head>
        <meta charset="UTF-8" />
        <title>Web Messenger</title>
        <script>
            !function(o,p,s,e,c){
            var i,a,h,u=[],d=[];function t(){var t="You must
            ...
            }(window,document,"Smooch","612909edbecf8200d7b3add5","5");
        </script>
    </head>
    <body>
        <script>
            Smooch.init({ integrationId: 612909edbecf8200d7b3add5 });
        </script>
    </body>
</html>
Using the HTML
<script>tag also allows version pinning. Simply replace the"5"in the(window, document,"Smooch"...)line with the specific version you would like to pin (for example, replace"5"with"4.29.21"). Alternatively, a major version can be specified (such as"4"or"5") to load the latest version of the specified major version. All versions4.0.0and later are supported. -
Click Confirm Integration.
-
Update any of the custom settings as desired and click Save changes.
Open the HTML file to make sure you don’t get any error messages by following the instructions in Testing your integration.
Adding Web Messenger using npm and webpack
This section describes how to integrate Web Messenger into Sunshine Desktop using npm and webpack. Webpack, among other things, lets you compile JavaScript files for use in a browser.
To integrate Web Messenger into Sunshine Desktop using npm and webpack:
-
In the Sunshine Conversations dashboard, click the app where you want to integrate Web Messenger or create a new one.
-
Click Connect Integrations.
-
Expand the Customer Channels section, select Web Messenger and click Connect.
-
Enter a unique name for this integration so you can easily find it.
-
Select npm as the method to use for this integration.
-
In a terminal window, change directory to your Web Messenger installation folder and enter the following commands to install the Sunshine Conversations package, set up a new npm package, and install the webpack modules.
$ npm install smooch $ npm init -y $ npm i webpack webpack-cli webpack-dev-server --save-dev -
Create a src folder.
$ mkdir src -
Change directory to your src folder and create an index.js file.
-
Change directory to your Web Messenger installation folder.
-
Edit your package.json file and add the following statement to the
scriptssection."dev": "webpack --mode development"Your package.json file should look similar to this:
{ "name": "web-messenger-webpack", "version": "1.0.0", "description": "", "main": "index.js", "scripts": { "test": "echo \"Error: no test specified\" && exit 1", "dev": "webpack --mode development" }, ... -
Run a test to make sure you don’t get any error codes.
$ npm run dev -
Install the HTML webpack plugin to simplify the creating of HTML files for webpack bundles.
$ npm i html-webpack-plugin --save-dev -
Add the HTML webpack plugin to your webpack.config.js file.
If you don’t have a webpack.config.js file, create one. Your webpack.config.js file should look similar to this:
const HtmlWebpackPlugin = require('html-webpack-plugin'); const path = require('path'); module.exports = { plugins: [ new HtmlWebpackPlugin({ template: path.resolve(__dirname, 'src', 'index.html') }) ] }; -
Create a basic HTML file in the src folder. In this example, the HTML file is index.html.
<!DOCTYPE html> <html lang="en"> <head> <meta charset="UTF-8" /> <title>Webpack Web Messenger</title> </head> <body></body> </html> -
Install webpack-dev-server. This provides you with a very basic web server.
$ npm i webpack-dev-server --save-dev -
Add
"start": "webpack serve --open 'Google Chrome'"to thescriptssection of your package.json.This just lets you easily start the server. Your package.json file should look similar to this:
{ "name": "web-messenger-webpack", "version": "1.0.0", "description": "", "main": "index.js", "scripts": { "test": "echo \"Error: no test specified\" && exit 1", "dev": "webpack --mode development", "start": "webpack serve --open 'Google Chrome'" }, "keywords": [], "author": "", "license": "ISC", "dependencies": { "smooch": "^5.3.4" }, "devDependencies": { "html-webpack-plugin": "^5.3.2", "webpack": "^5.41.1", "webpack-cli": "^4.7.2" } } -
Add
mode: 'development'beneath the module.exports line in your webpack.config.js file.This instruct webpack to use the development mode (as opposed to production mode.) Your webpack.config.js file should looks similar to this:
const HtmlWebpackPlugin = require('html-webpack-plugin'); const path = require('path'); module.exports = { mode: 'development', plugins: [ new HtmlWebpackPlugin({ template: path.resolve(__dirname, 'src', 'index.html') }) ] };
Copy the code from Step 4 Initialize Sunshine Conversations with your integration Id into your index.js file.
The contents of the index.js file should look similar to this (the integration ID will correspond to your own installation):
var Smooch = require('smooch').default;
Smooch.init({ integrationId: 612909edbecf8200d7b3add5 });Open the HTML file to make sure you don’t get any error messages by following the instructions in Testing your integration.
Testing your integration
If you followed one of the detailed steps above, you can test your integration by opening the HTML file directly using the filesystem.
-
Open the HTML file using one of the following methods:
- If you are using HTML
<script>tag, double-click your HTML file. - If you are using npm with webpack method, run the
npm startcommand.
- If you are using HTML
-
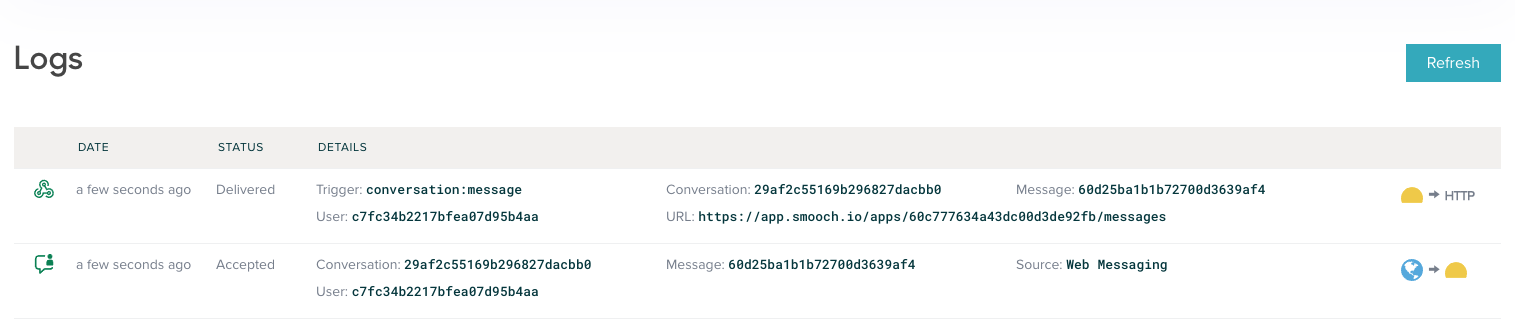
Click the talk icon in the lower right corner and start a conversation. Enter a message such as This is a test.
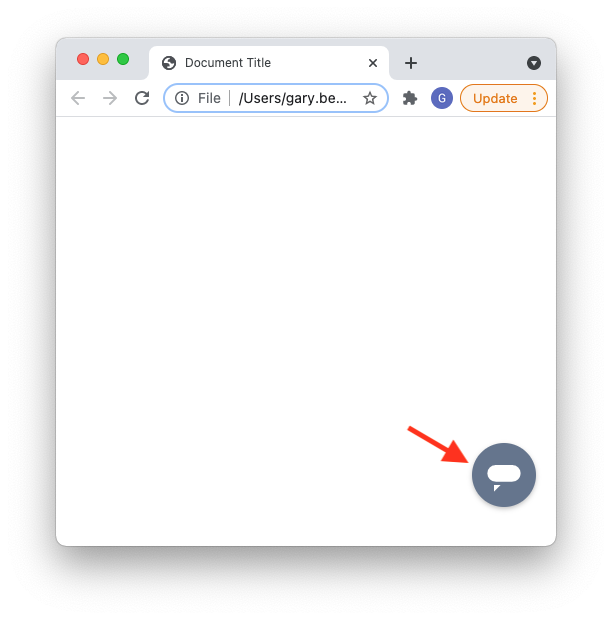
-
In the Sunshine Conversations dashboard, open the app where you integrated Web Messenger and click Logs.
If you see something similar to this, your integration is successful.

Once your server is listening for requests, create a webhook to receive the message.
-
In the Sunshine Conversations dashboard, open the app where you integrated Web Messenger and click Connect integrations.
-
From the categories list on the left side, click API & Webhooks and then click Webhooks.
-
Click Connect and then click Create a webhook.
-
Enter your webhook URL.
-
Check the Conversation message trigger and then click Create webhook.
To test your webhook:
-
Open the HTML file and enter a message such as This is another test.
-
In the Sunshine Conversations dashboard, open the app where you integrated Web Messenger and click Logs.
If you see something similar to this, your webhook is receiving your messages.
Keeping up to date
Web Messenger is frequently updated. Your installation is automatically kept up to date when using the HTML <script> tag installation method. Using npm, you can upgrade to the latest version by running npm update smooch or changing the version of smooch in the dependencies section of your package.json file.
Each versions are posted as releases in the Web Messenger GitHub repository with corresponding release notes.
To receive an email when a new version is published, you can use GitPunch to subscribe to release updates:
- Open https://gitpunch.com/
- In the search box, enter
https://github.com/zendesk/sunshine-conversations-weband selectzendesk/sunshine-conversations-webfrom the autocomplete pane. - Using the blue slider, select which type of release (All, Patch, Minor, Major) you want to be notified about.
- Click on “GitHub Sign In” to create a GitPunch account using your GitHub login or click “Enter Email” to signup with an email address and password.
Once configured, you’ll start receiving emails similar to the one below when new versions are published.
Region configuration
Web messenger is supported in the following regions:
| Region | Region identifier |
|---|---|
| United States | Leave unspecified |
| European Union | eu-1 |
To target the EU region, the region identifier is passed to Smooch.init():
<script>
    Smooch.init({
        integrationId: '<integration-id>',
        region: 'eu-1'
    }).then(
        function () {
            // Your code after init is complete
        },
        function (err) {
            // Something went wrong during initialization
        }
    );
</script>
If you are a licensed Zendesk customer, use configBaseUrl instead of region. configBaseUrl specifies the URL where the config request is sent. For example:
<script>
    Smooch.init({
        integrationId: '<integration-id>',
        configBaseUrl: 'https://<subdomain>.zendesk.com/sc/'
    }).then(
        function () {
            // Your code after init is complete
        },
        function (err) {
            // Something went wrong during initialization
        }
    );
</script>
Login with externalId and JWT
After Sunshine Conversations has initialized, your user can start sending messages right away. These messages will show up on the business-side under a new Sunshine Conversations user. However, these users will not yet be associated to any user record you might have in an existing user directory.
If your application has a login flow, or if a user needs to access the same conversation from multiple devices, this is where the login method comes into play. You can associate Sunshine Conversations users with your own user directory by assigning them an externalId. You will then issue each user a jwt credential during the login flow. You can read more about this in the Authenticating users section.
Authentication delegate
The Web Messenger offers an onInvalidAuth which will be called when an invalid authentication token has been sent to Sunshine Conversations. It allows you to provide a new token for all subsequent requests. The request that originally failed will be retried up to five times.
Smooch.init(SmoochOptions).then(function() {
    Smooch.setDelegate({
        onInvalidAuth() {
            return new Promise((resolve) =>
                resolve('my-new-auth-token')
            );
        }
    });
});
See Expiring JWTs on SDKs for more information.
Files
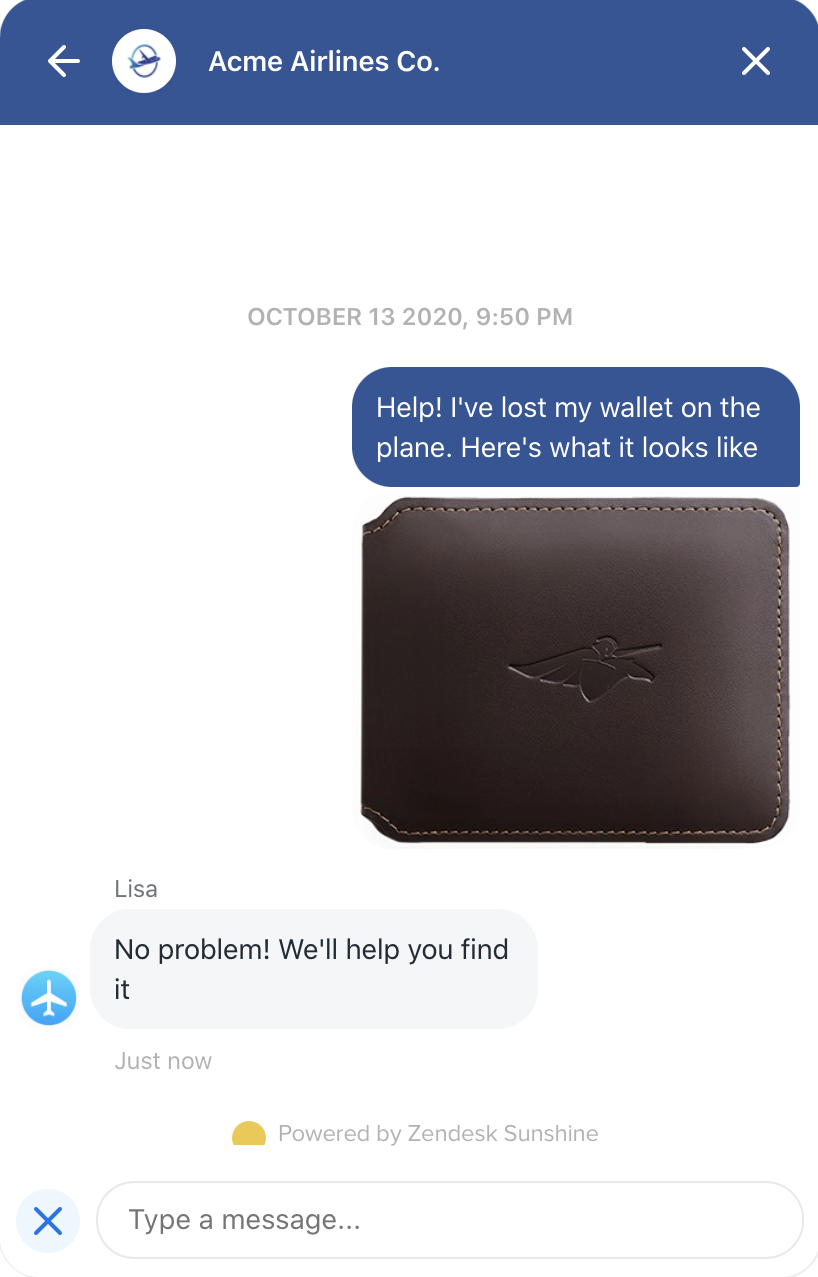
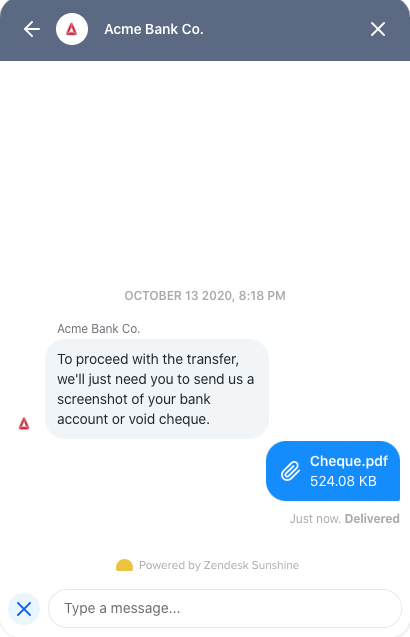
The Web Messenger has full native support for sending and receiving files. See our API documentation for instructions on how to send one.
Customization
The Web Messenger includes a set of built-in customization options which you can leverage in 3 ways:
- Via the Update Integration API.
- Using the Sunshine Conversations dashboard to manually set styling options in the Web messenger settings page.
- Passing in styling settings in the call to the
Smooch.initmethod.
Embedded mode
Supported by the Smooch.init method.
To embed the widget in your existing markup, you need to pass embedded: true when calling Smooch.init. By doing so, you are disabling the auto-rendering mechanism and you will need to call Smooch.render manually. This method accepts a DOM element which will be used as the container where the widget will be rendered.
Smooch.init({
    integrationId: '<integration-id>',
    embedded: true
}).then(() => {
    var user = Smooch.getUser();
    // your code
});

Smooch.render(document.getElementById('chat-container'));
Be sure to place .render() outside of the .init().then() function. If you place it inside the function, a race condition happens and unexpected results can occur.
Strings customization
Supported by the Smooch.init method.
The Web Messenger lets you customize any strings it displays by overwriting its keys. Simply add the customText key in your Smooch.init call and specify new values for the keys used in Sunshine Conversations. You can find all available keys here. If some text is between {}, or if there is an html tag such as <a>, it needs to stay in your customized text.
For example:
Smooch.init({
    integrationId: '<integration-id>',
    customText: {
        headerText: 'How can we help?',
        inputPlaceholder: 'Type a message...',
        sendButtonText: 'Send'
    }
}).then(
    function () {
        // Your code after init is complete
    },
    function (err) {
        // Something went wrong during initialization
    }
);
Date localization
Supported by the Smooch.init method.
When using strings customization to translate the interface, you will also want to have Web Messenger show the date and time in the right language. To do this, simply pass locale at initialization time. You might also want to override the timestamp format to match your language. You can learn more about formats here.
Smooch.init({
    integrationId: '<integration-id>',
    locale: 'fr-CA'
    customText: {
        // ...
        conversationTimestampHeaderFormat: 'Do MMMM YYYY, hh:mm',
        // ...
    }
})
    .then(
        function() {
            // Your code after init is complete
        },
        function(err) {
            // Something went wrong during initialization
        }
);Display Style
Supported by the Smooch.init method, the Web Messenger settings page in the dashboard, and the Update Integration API.
The Web Messenger can be displayed as a button or as a tab. The default style is the button mode.
When the display style is a button, you have the option of selecting your own button icon. The image must be at least 200 x 200 pixels and must be in either JPG, PNG, or GIF format.
Smooch.init
Specify the displayStyle and buttonIconUrl in the call to Smooch.init.
Smooch.init({
    integrationId: '<integration-id>',
    // ...
    displayStyle: 'button',
    buttonIconUrl: 'https://myimage.png'
    // ...
}).then(
    function () {
        // Your code after init is complete
    },
    function (err) {
        // Something went wrong during initialization
    }
);
Button Size
Supported by the Smooch.init method, and the Update Integration API.
You can customize the size of the button by setting a buttonWidth and buttonHeight. When not provided, the button will have a default size of 58 x 58 pixels.
Smooch.init
Specify the buttonWidth and buttonHeight in the call to Smooch.init.
Smooch.init({
    integrationId: '<integration-id>',
    // ...
    buttonWidth: '90',
    buttonHeight: '90'
    // ...
}).then(
    function () {
        // Your code after init is complete
    },
    function (err) {
        // Something went wrong during initialization
    }
);
Fixed Header
Supported by the Smooch.init method, and the Update Integration API.
You can set the introduction header to fixed mode by setting fixedHeader to true. When set, the header will be pinned at the top of the conversation instead of scrolling with it. The default value is false.
Smooch.init
Smooch.init({
    integrationId: '<integration-id>',
    // ...
    fixedHeader: true
    // ...
}).then(
    function () {
        // Your code after init is complete
    },
    function (err) {
        // Something went wrong during initialization
    }
);
Colors
Supported by the Smooch.init method, the Web Messenger settings page in the dashboard, and the Update Integration API.
The supported color customizations are:
-
The Brand Color customizes the color of the messenger header. It is also used for the color of the button or tab in idle state, as well as the color of the default app icon. If no color is specified, the brand color will default to #65758e.
-
The Conversation Color customizes the color of customer messages and actions in the footer. If no color is specified, the conversation color will default to #0099ff.
- The Action Color changes the appearance of links and buttons in your messages. It is also used for the ‘Send’ button when it is in active state. If no color is specified, the action color will default to #0099ff.

Smooch.init
Smooch.init({
    integrationId: '<integration-id>',
    // ...
    customColors: {
        brandColor: "7af442",
        conversationColor: "b7b7b5"
        actionColor: "191919"
    }
    // ...
})
    .then(
        function() {
            // Your code after init is complete
        },
        function(err) {
            // Something went wrong during initialization
        }
    );
Business profile
Supported by the Smooch.init method, and the Update Integration API.
You can customize your business branding with the businessName and businessIconUrl settings. For the businessIconUrl setting, the image must be at least 200 x 200 pixels and must be in either JPG, PNG, or GIF format.
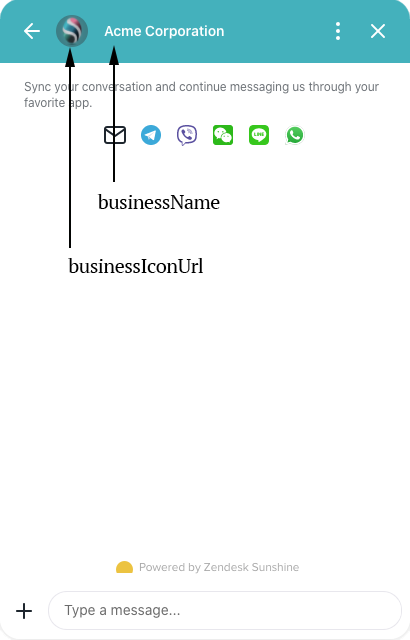
Smooch.init
Smooch.init({
    integrationId: '<integration-id>',
    // ...
    businessName: 'Acme Corporation',
    businessIconUrl:
        'https://is2-ssl.mzstatic.com/image/thumb/Purple127/v4/67/a4/5b/67a45b68-c821-842f-22f5-9fa83b605ce3/mzl.evidoiah.jpg/1200x630bb.jpg'
    // ...
}).then(
    function () {
        // Your code after init is complete
    },
    function (err) {
        // Something went wrong during initialization
    }
);
Background Image
Supported by the Smooch.init method, and the Update Integration API.
You can customize the background image in your SDK with the backgroundImageUrl setting. The image will be displayed at its full size, and tiled if it is not large enough to fill the conversation.
For reference, the following CSS will be used to display the background:
 {
    background-image: url('https://a-nice-texture.png');
}
Smooch.init
Smooch.init({
    integrationId: '<integration-id>',
    // ...
    backgroundImageUrl: 'https://a-nice-texture.png'
    // ...
}).then(
    function () {
        // Your code after init is complete
    },
    function (err) {
        // Something went wrong during initialization
    }
);
Sound notification
Supported by the Smooch.init method.
By default, a sound notification will be played when a new message comes in regardless of whether the window is in focus or not.
To disable this feature, you need add the soundNotificationEnabled option to the Smooch.init call, like this:
Smooch.init({
    integrationId: '<integration-id>',
    soundNotificationEnabled: false // Add this line to your 'Smooch.init' call
}).then(
    function () {
        // Your code after init is complete
    },
    function (err) {
        // Something went wrong during initialization
    }
);
Browser storage
Supported by the Smooch.init method.
By default, the Web Messenger will store the identity of anonymous users in the localStorage of the browser.
Using the localStorage will persist the user identity through out browser sessions (including page reloads and browser restarts). To clear the user identity once the browser is closed, use sessionStorage instead. Learn more
Smooch.init({
    integrationId: '<integration-id>',
    browserStorage: 'sessionStorage' // Add this line to your 'Smooch.init' call
}).then(
    function () {
        // Your code after init is complete
    },
    function (err) {
        // Something went wrong during initialization
    }
);
Menu items
Supported by the Smooch.init method.
The Web Messenger features a menu that allows the user to send various message types. The types displayed in this menu can be customized, or the menu can be hidden altogether.
If you want to control this menu, add the menuItems option to the Smooch.init call:
Smooch.init({
    integrationId: '<integration-id>',
    menuItems: {
        imageUpload: true,
        fileUpload: true,
        shareLocation: true
    }
    // ...
}).then(
    function () {
        // Your code after init is complete
    },
    function (err) {
        // Something went wrong during initialization
    }
);
To hide the menu completely, override the menuItems option as follows:
Smooch.init({
    integrationId: '<integration-id>',
    menuItems: {}
    // ...
}).then(
    function () {
        // Your code after init is complete
    },
    function (err) {
        // Something went wrong during initialization
    }
);
Filtering and transforming messages
The Web Messenger allows you to filter and transform messages by using the beforeDisplay delegate. To set a delegate, use the setDelegate method.
This may be useful if you want to conditionally filter specific messages or transform their structure. See the Message Schema section to learn more on the message properties that you can access and modify. You may also want to set your own properties using the beforeSend delegate.
Filtering messages
The following example sets a beforeDisplay delegate method to check if a message has been marked as archived in the metadata for a specific conversation (this can be done using the beforeSend delegate method for example). If the field isArchived is true, we instruct the SDK to hide the message by returning null. If not, we simply return the original message unmodified.
const delegate = {
    beforeDisplay(message, data) {
        if (data.conversation.id === '<conversation-id>' && message.metadata && message.metadata.isArchived) {
            return null;
        }

        return message;
    }
};

Smooch.init({
    integrationId: '<integration-id>',
    delegate
});
Transforming business messages
The following example sets a default author name on messages for a specific conversation that lacks one if they are originating from the business. We first check if the message is sent by the business and if a display name has been specified. If not, we set it and return the modified message.
const delegate = {
    beforeDisplay(message, data) {
        if (data.conversation.id === '<conversation-id>' && message.role === 'business' && !message.displayName) {
            message.displayName = 'Acme Bank';
        }

        return message;
    }
};

Smooch.init({
    integrationId: '<integration-id>',
    delegate
});
Transforming user messages
The following example adds the URL of the page the user is visiting while messaging a business for a specific conversation. This can be useful when users navigate within a site while messaging. We first check if the message role is user and then add a currentUrl attribute in the metadata property.
const delegate = {
    beforeSend(message, data) {
        if (data.conversation.id === '<conversation-id>' && message.role === 'user') {
            message.metadata = {
                ...message.metadata,
                currentUrl: window.location.href
            };
        }

        return message;
    }
};

Smooch.init({
    integrationId: '<integration-id>',
    delegate
});
Transforming postback
The following example adds the URL of the page the user is visiting while actioning a postback for a specific conversation. This can be useful to tailor the reaction to the postback in accordance to the current page. We add a currentUrl attribute in the metadata property.
const delegate = {
    beforePostbackSend(postback, data) {
        if (data.conversation.id === '<conversation-id>') {
            postback.metadata = {
                ...postback.metadata,
                currentUrl: window.location.href
            };
        }

        return postback;
    }
};

Smooch.init({
    integrationId: '<integration-id>',
    delegate
});
Whitelisting Domains
By default, the Web Messenger can be initialized from any domain with the use of the integrationId. To limit domains where Web messenger can be used, you can use the originWhitelist setting in the Update Integration API.
When the originWhitelist is set, Sunshine Conversations restricts the access to only the origins listed in the array by implementing Cross Origin Resource Sharing (CORS). More specifically, it will look at the Origin header during initialization and block it if the Origin is not part of the originWhitelist array.
Notes:
localhostis supported as a valid hostname in the origin, so you can test when doing local development.- Wildcard subdomains are not currently supported, so you need to list all of your supported domains individually.
Content Security Policy
If your deployment requires CSP compatibility, add the following meta tag to your configuration.
<meta
    http-equiv="Content-Security-Policy"
    content="
    connect-src
        wss://*.smooch.io
        https://*.smooch.io
        wss://*.zendesk.com
        https://*.zendesk.com;
    font-src
        https://*.smooch.io
        https://*.zendesk.com;
    script-src
        https://*.smooch.io
        https://*.zendesk.com;
    style-src
        https://*.smooch.io
        https://*.zendesk.com;
    img-src
        blob:
        https://*.gravatar.com
        https://*.smooch.io
        https://*.zendesk.com;"
/>
Note that an equivalent configuration can be done server side.
According to the channels you use, other domains may need to be added:
These are used to display QR codes to link the Web Messenger conversation
- LINE: https://qr-official.line.me
- WeChat: https://mp.weixin.qq.com
- WhatsApp: https://wa.me
This is used to allow buy actions from the Web Messenger.
Note that your CSP configuration should also include any domains used to host images or files sent in messages.
If you require blob: to be excluded for img-src, you must disable the image upload feature via the init settings.